Thats not the case in this test. This layup curled do to heat lamps being applied.When I noticed it and turned off the lamps it layed back down.
Thanks,
Terry
I unveiled the test layup this morning. The layup looks good with no voids on either side.
My first observation is that it seems a little flimsy. When I cut it in half it frayed. So the layup is dry.
Thanks to talking with you guys I’m confident its because I covered the whole part in flow media and it infused too fast.
Another thing I’m wondering about is when the infusion was complete I terminated the resin inlet but kept the vacuum running for the whole night. Could this suck the layup dry? This epoxy is a slow drying epoxy (24hr) but with heat it will kick in about three hours. So I was applying vacuum for three hours straight.
And one more thing that will help me. Do you guys have an idea how long it should take a 15"x15" part to infuse,this part took about 10 minutes. Would 20 minutes be better?
Terry
Leaving the vacuum on shouldn’t suck resin out of the part. I do this frequently with all my parts until the resin gels.
How far are you extending your mesh? You could undercut it so the resin will flow easily through the mesh but suddenly stop at the mesh end. Like this
Every material and resin is slightly different, so I would just say test it till it works then repeat that process. There are calculations you could do but they’re pretty hard, or programs you could buy, but they’re pretty expensive. Just rely on trial and error and then experience!
1: The stress concentrations of a laminate changes on how you lay up the stack. That is why we always say, keep the layup balanced!! Equal # of layers, in the same orientation, mirrored at the midplane. ie: 0/90/45/-45 MIDPLANE -45/45/90/0 Face sheets are the same. If you have more stress in one direction, it will pull that way, and warp.
2: uni is a pain to cut. I have had problems with fraying for ages, while woven is fine. Uni-prepreg is HELL when cut…millions of sharp splinters. It also depends on your resin!!! If the fiber is sized for epoxy only, and you are using PER/VER, then the resin will not bond to the fiber well.
3: the flow media might also be the issue. But you knew that.
I understand. Ill leave a portion of the layup bare of flow media and make adjustments to the flow media as I run tests.
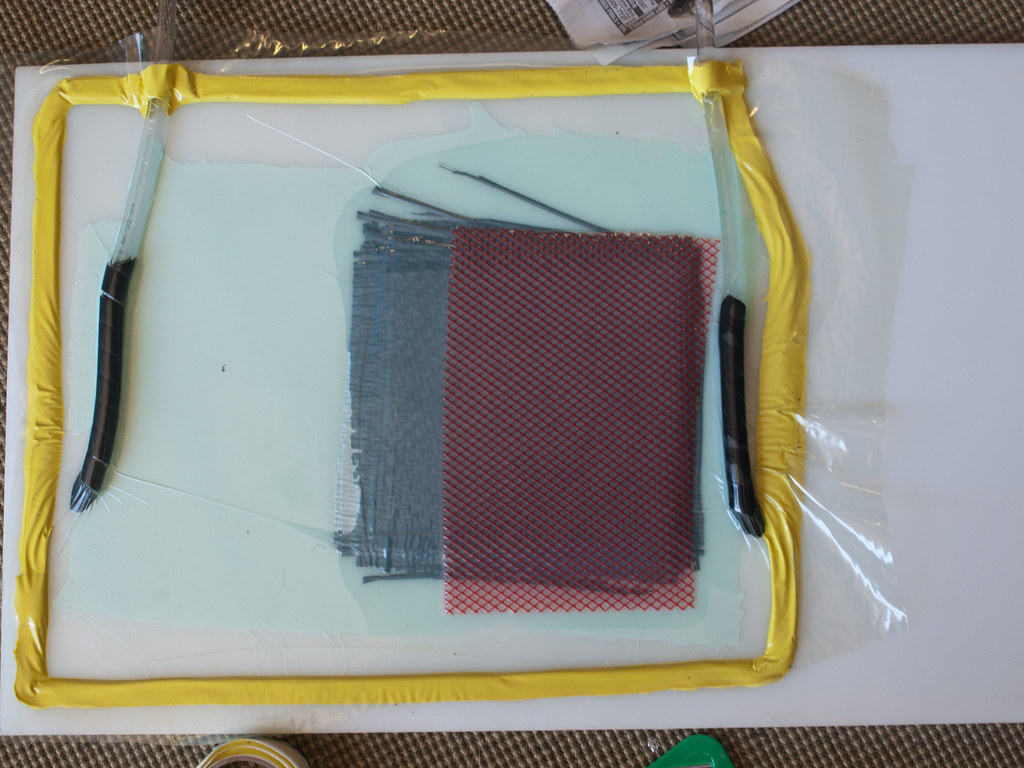
Also,I see you are using red flow media. Mine is green. Some have mentioned that the red may be a slower media. I’m considering switching this up also. I tried reading the descriptions of the two different meshes but there wasnt any real differences spelled out. The mesh size looks the same in your picture as my green media. Is the red a slower media?
Thank you ,
Terry
Hi Riff,
How you explained the warping issue makes sense to me.
I have decided to change up the materials and use more weaved material in the layup.
Here’s a sloppy diagram showing the different layers, materials and orientation I was planning on laying down.Now that you made me aware of the possible warp issue I’m concerned about “this” setup also because there is one piece of uni heading up at about a 22 degree angle and another heading up at about a 67 degree angle.
I think Directionally this is where the main stresses will be on the fin when in use. So I am trying to add strength in these directions. But at this point it is not mirrored on the other side.
Anyway I’m hoping you could look at the diagram and give me your thoughts on the orientation.
Thanks , Terry
In this layup the resin feed line is not touching the infusion mesh, so the mesh basicly is there for nothing. You will need to extend the mesh under the feed line.
See it like stream of cars. The feed line is a parking lot with loads of cars, the mesh is a 6 lane highway (and the black knitted Airtech mesh can be considered a 18 lane highway…)
However, in between is just peelply, which is like badly adjusted traffic lights…
On computer programs: They will not predict this type of layups. What the workflow with these programs is, is the following:
-dimension the part in the program (or import it)
-define feed lines
-define runners
-define vacuum ports
-define material properties, specifically permeability
-run simulation, see if dry spots might develop, see infusion time
-adjust parameters
-rerun simulation
etc, until you are happy.
The permeability, however, needs to be determined for every laminate which is in the part. Which means you will need to test it. Setup a 30cm (1ft) by 120cm (4ft) test piece, infuse, and measure the resin front every minute. This goes into an excelsheet, which spits out 2 things: A graph which shows if the test is valid, and the permeability. (this is explained in my upcoming book)
One other thing: If your laminate is not symetrical, it can warp, depending on many factors. Keep vacuum on it and postcure it while still under vacuum. Vacuum will not suck dry the laminate, as there is no bleeder around. Always leave vacuum on as long as feasable. Therefore I like pumps which switch off when a certain vacuum is reached.
About the yellow sealant tape: If this is Airtech AT200Y, then also try their Airseal 1 (low tack) and Airseal 2 (high tack). This saves you some bucks.
Ive taken everyones advice and will orientate the material so it is balanced. Also Ill make sure the spiral tubing on the inlet touches the flow media.
I feel that I have been fairly verbal, asking questions that you guys have probably all answered 100 times before, for that I am sorry. Its just that I am new to this and want to get it right.I am waiting on the material to get here and Im getting excited 
I need to run some tests on the actual mold and then Ill get back with results.
But I do have just a couple more questions:
As far as leaving the flow media short on the part, I assume that if I cut the material larger I could lay the flow media on the whole part area and leave the overlap on the flange bare by about one inch on one , two , or three sides. Is this correct.
Using carbon for tests gets expensive,Should I be doing initial tests in fiberglass?
Thanks a million for hanging in there with me.
Terry
Of course, keep in mind that for a FLAT plate direction is critical. If you are making a shaped part, it doesn’t matter that much, and it’s more of designing the layup for what the part is used for. Your fin mold seems to have a shape, which will help hold shape better (in short, a bend is like adding a rib/stiffener to a flat sheet)
I don’t fuly understand your diagram, but try to get a good mirror image as best you can. like 0/90 Twill, 45 plain, 0 Uni, | 0 uni, 45 plain, 0/90 twill. Not 0/90 twill, 45 plain, 0 uni | 45 plain, 0 uni, 0/90 twill.
So bloody hard to explain
Again, if your part isn’t fully flat, and has curves, angles, bends, etc…then you can start reinforcing areas you know will see higher loading, like the leading edge, or the mounting base of the fin.
yeah. As long as the resin has a short time in ONLY fiber…that way, it will pull the resin through the fabric fully to the edge, not just on top. So either shorter distro media, or larger fiber cuts.
Agreed that the mesh needs to touch the line. Screwed it up on this one when the mesh moved after I sealed the bag. The mesh still does its job though as the resin flow front will advance more easily through the mesh section.
Riff , Canyon, Thanks for the quick response.
Hopefully Ill get a test going on the actual mold today or tommorrow. Ill post pictures of the results.
Terry
Ok, This second test didn’t go so good.
I used a different epoxy “Proset” It was more the correct epoxy for the job, Thinner viscosity. When I stated allowing the epoxy in, it flowed like crazy but looked like it was working well.Then I quickly realized I didn’t mix enough, So I clamped it off and mixed some more. When I filled the bucket back up and released the line it started to flow and then it quit flowing, The epoxy actually looked like it was backing up.
In the last setup I had a path of flow media from the vacuum source to the layup, I left this out on this layup thinking peel ply would do the job.
Should there be a path of flow media from the vacuum source to the layup? I’m really not sure where to go from here.
Terry
Is that paper on your tool surface? what is it there for? You should never have your flow medium touching the vac source, end it short and have vac source connected to laminate by peel ply only.
It looks like teflon coated tape to me.
The beige looking stuff on the tool is peel ply.
I didn’t have flow media touching the vac source this time, but on the last test I did. So thanks for clarifying that.
after I refilled the resin tub , it was like I lost vacuum but I didnt , the epoxy would not flow through the resin tube .
Everyone said to slow down the infusion process by leaving an inch of carbon not covered with flow media which I did. But with this infusion resin it was across the layup in 30 seconds.
Now Im really confused.
by ending the flow media slightly short, this helps the resin flow in the Z direction before ending, keeps the resin flow from overflowing and traping air. Infusion will go quickly on a part that size, so be sure to mix enough resin next time and youl be good.
Will do. Everything looked good until I noticed I was low on resin. In the beginning the resin moved fast but I was expecting it to slow down when it hit the part of the layup not covered by flow media.
I noticed something else, In the attempt before this one I covered the spiral tubing with peel ply, but I forgot to cover the tubing this time. Are there any implications with bare spiral tubing at the resin side?
And I noticed one more thing . I had degassed the epoxy. There were cstill some bubbles on top , When I ran low and dumped more in it mixed those bubbles and introduced air into the layup.
I think Ill skip degassing for now.
Thanks , Terry
i realized i have NO pictures of my infusions, and that is what I do on a daily basis…wow. Anyway…i will make one and take a video and pictures tomorrow…cuz what you have there is a mess.
1: take off that peelply on the tool…all of it.
2: take picture.
3: what in the world are you doing at “1”?? are you tacky taping on top of the breather, and adding another bag past your mold? I’m lost.
Riff- Please , post some pictures.
Ill explain your #3 question first.
I was shown a demo by an epoxy supplier, He suggested I make what he called a tongue off the side of the mold to make the flange bigger and give the epoxy more time to flow before it hits the vacuum inlet.
I put tacky tape down , then bag the tongue. Then lay the tongue bag down on the 1st tacky tape, then put tape over the top of the tongue and put the actual bag on top.
It works, It makes more room,“But”, It takes more time and more materials and adds another variable for failure.It hasn’t given me a problem yet though.
The demo guy said , after I do a few I may cancel the tongue depending on how far the epoxy reaches.
Maybe I should cancel the tongue right now but if I do I’m pretty sure epoxy will hit the vac line before infusion is complete.
What happens to the layup if resin hits the vacuum port?
I was told to put peel ply down on the bottom . To cover the whole mold butting up to the tacky tape. Is This wrong. I do want an etched finish for attaching in the end.
When I get this closer to right, will I need to spray a little surface coat in at the 90 degree angle, The corners are leaving voids.
I realize its a messy set up but I think it would have worked if I would have not ran out of resin.
If you will take the time to take a picture , Ill try to set up more the way you show it.
Thanks , Terry