Building a plug in a shed

Fair enough, I have never look close at a real one (not enough to notice that the nose isn seporate) I just assumed that the nose was seporate! well we all know what assumtion is … the mother of all fcuk ups!..

Well its certainly looking good there anyhow. keep the pics flowing.

Sensational Chris, well done and thanks for the Flickr link.
Must have been difficult working in your cold conditions, are you able to raise the temp to something reasonable?

fantastic progress chris, looks like you only have one mould section left to make, the lower nose section that has the intake ducts in it. You must have spent a lot of time on that over the last week to have soo much progress… keep up the work… looking forward to more…

Matt

what vacuum system are you using?

I am not, it is just poly wet lay up for the moulds, the airline fittings you see on them are to be used to help “release” the finished parts, just connect the airline and open the tap. Am undecided as to what to use for the lay up of the finished body, will prob just do a Poly/CSM layup to help break in the moulds then use some Swabblack or T35 poly gel and wet lay up some 2/2 twill glass using epoxy (they seem to use this method with the gliders I fly and they are light/strong and show liitle signs of delamination after extended periods of time)
I do have a heater in the workshop but this has been the biggest headache during the winter we have had, trying to get everything warm!
Matvd, will update with some more pics only my phone is US so will take my camera, have managed to get all the moulds off/cleaned up, took a bit of work and damaged the plug but the moulds are fine.
regards Chris

Well, moment of truth today, popped the body from the moulds, came out a treat, ended up using 4 layers of 450g/m CSM with a 2x2 twill 300g/m glass for final layer, am very happy with it. Will prob do another (try and get a real lightweight one) when it warms up, early summer. Anyway a couple of pics for you

And the wheel arch vents that I thought i`d poss have some issues with regarding release, came out just fine.

regards Chris

Chris, Congratulations! I’ve been watching your flickr posts almost daily. I’m amazed with how quickly you’re moving along. Thanks for sharing!

Fantastic chris. That first body is probably a little heavy but better that than too thin and weak for a first item. A good way to test out your moulds and the results look very good.

Keep posting the pics up. Im loving your work and the speed at which your doing it all.

Wow, looks like a great first part.

chris has now made the tail section in GRP as well, looks fantastic.

Have a look on his photostream or even better, get some pics posted here chris!

Yes, sorry for delay, managed to get a tail section out, did a much lighter lay-up, 1 300csm +2x 450 + 1 380 2x2 twill and it does seem about right, suspect I will do another front section to this spec. Enough gassing, some pics for you.
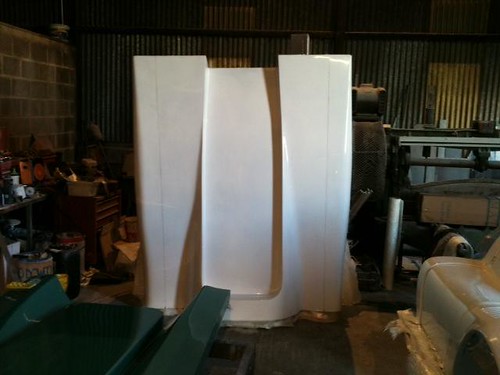
first one is of it laid up ready to be released
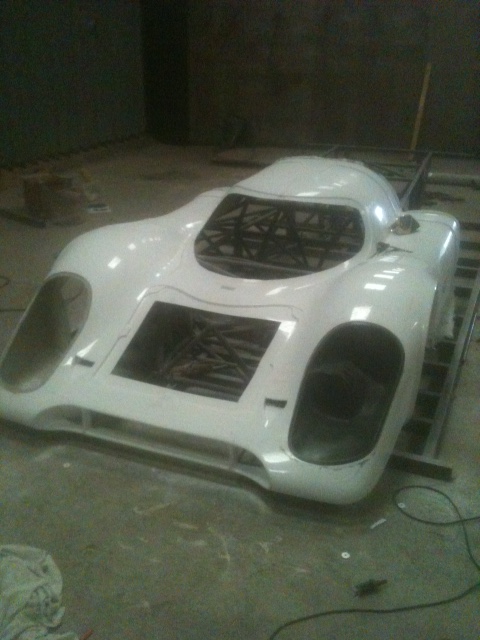
rear section

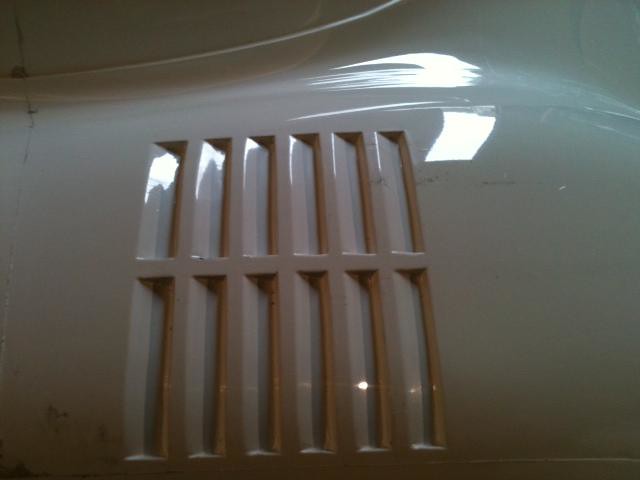
close up, needs a good trim etc yet

So this will be the end of the fibreglassing for a while now, have a spaceframe to make but will keep you updated with progress from time to time

I do and will post pics on my Flickr page http://www.flickr.com/photos/47153142@N03/sets/72157623861979360/

best regards Chris

Having made a soapbox with gallons of polyester filler and knowing the time it took to do something to a much lower standard than you have achieved, I take my hat off to you. unbelievable commitment, hope it all works out nicely :slight_smile:

Excellent job, any more updates, would love to see the finished project. It has spurred me on with my projects seeing someone doing it on a larger scale.
Dave

Wow, looked through all the pics on flickr. Outstanding work!

Simply amazing. Bravo!

Thanks all, work continues and i`m afraid it is not finished yet!!! But I am getting there slowly, the tube chassis takes an age to construct but am pretty much done now, next task is to fabricate some wishbones and get the rear wheels on, I shall then do the front suspension. I have someone who has done the chassis in CAD so we will be able to laser cut all the tubes (what has taken me 9mths to do can now be done in under a week and it will probably be more accurate than mine too!) Just amazing what modern tools can achieve!!! So there will be the possibility of a kit being produced if anyone feels stupid enough to want to make one for themselves!!!
best regards Chris

Hi all, thought I’d do an update as done a fair bit of work over the year or so since last on!
I have made the first chassis (hand made) this is basically a mock up, to provide measurements for the first “works” chassis, all measurements have been put into CAD and we now have a complete laser cut tube set for the car. I have done the sill moulds, dash moulds, light pod moulds and seat molds, produced another body for someone else and done a lighter one for myself. So will just post a series of pictures as more fun than reading my drivel!!
bodywork on just checking sill plugs for shape prior to taking mould
Got the dash moulded

The sills moulded, pic show first one out and how it mates to the tube frame

The first CNC’d Laser cut chassis in CAD designed jig being Tig welded up

3rd body placed on the first CNC cut chassis to check fitment

And that is about where I’m at now, just started doing the wishbones, uprights are being machined from Billet alloy, seat mould done, so hopefully by spring I should have the engine and box in and it on it’s wheels but still some way to go yet!!
regards C

I used to mess with car rebuilds… the most important thing to remember when buying the donor car is MAKE SURE IT COMES WITH A TITLE! Otherwise you’ll never get it registered. Could take years. Motor vehicle won’t be nearly as impressed as we are.
Excellent work!

Great job. Really great.

Congratulations for being a glider pilot as well … not to mention the trmendous amount of “composites power” to achive such a result with your 917