Wrapping parts. Time to Finish

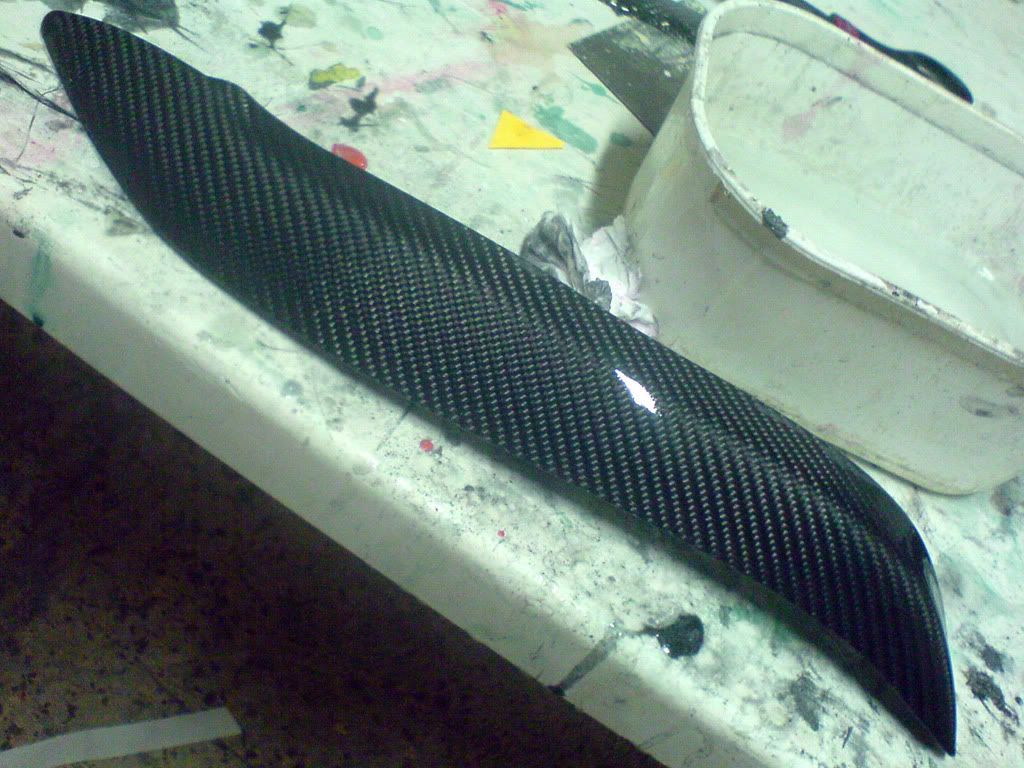
I wrapped the c pilars from my car. I used some epoxy resin from PTM&W Industries.

I have tried sanding some practice area before and it was strange. The resin felt kind of soft. When i sanded with rough stuff, it scrapped the coating byond repair. When i sanded with fine grit, the resin became a cloudy white color and I was unable to get it to a nice polished finish.

What am I missing here? Should i apply clear coat before sanding? I thought I was going to be able to snad the resin directly.

Are some resins sandable and others not? Is this because of the epoxy? Because I am sanding by hand? What?
Eager to finish things up

from my experience all plastics ( including epoxy ) will sand. the trick is to know when to stop sanding and what grit of sandpaper to use before you reach the carbon weave. Both types of epoxy I use turn white when sanded. I’ll just post up how I do my overlay parts and this also goes for clear epoxy surface coats over a laminated part. Cosmetic stuff.

  1. How thick is the resin on the surface of the part to begin with… does it look like the carbon weave is is right there and there is hardly any clear resin on top? If so I just wet sand the part with 320P. This just creates a surface for the next coat of epoxy to mechanically bond to. some say use 220P but in my experience those 220 scratches will show thru on a cosmetic part. Once you wash the part real good with rinse water and soap, then let it air dry, but DO wipe the surface clean with a towell or soft rag. Water spots under clear look bad. Also use a clean white rag and acetone to wipe the part after the water dries off of it.

In a dust free area, now use clear epoxy and a paint brush to apply a nice heavy thick layer of epoxy over the part. Let it cure at least 24 hours.

Next I get out the 220P. And I block sand the part as flat as i can get it without going into the weave. Start to see weave… STOP. Now wet sand again with 320 wet. This is just to remove the 220p scratches. Clean the part again, wipe it down with acetone again. let it air dry for 5 minutes after wiping with acetone. Now recoat the entire part again with more clear epoxy, again very thick.

Repeat this process until no weave or “pits” are left in the part. I also use a butane torch to heat the wet epoxy on the part. This gets rid of air bubbles fast. But use extreme caution doing this and hold the torch about 6-8 inches away from the part and set it on low flame, keep the flame moving around the part or it WILL set it on fire. The surface coat epoxy i use this is what is recomended. don’t do this with a flamable epoxy or vinylester or polyester resin… you’ll probably burn the part up fast. As TET suggested Klear Kote epoxy is excellent for cosmetic work and won’t catch on fire so long as you follow the directions.

for a final sanding finish i use 320 wet, then move up to 400 wet paper. Then after that clean the part and paint it with 2K urethane clear coat. Good to go.

personally, i apply 4 to 6 layers of clear epoxy, without sanding in between, and then after its cured for at least 24 hours in the summer, 2 days in the winter, i start sanding with 240 wet, and when it becomes flat and sexy, i go, 320, 600, 800, 1000, 1200, washing the part in between. then i clearcoat it.

this is an overlay. used two layers of 100grm glass with black epoxy resin, then stuck carbon on it with spray adhesive, and applied epoxy… this is not clearcoated, just wet.

anything finer than 500 grit paper is a no no for clear coating with automotive clear coat. It will eventually peel right off because there is so little mechanical adhesion. And with clear coat there never is chemical adhesion to the resin surface.

400 is just right… it eliminates the scratches that can be seen thru the clear coat. :slight_smile:

Not trying to bash your work… i just want you to have parts that the finish lasts a very long time.

I can’t understand why you sand between coats of resin as it’s chemical adhesion right? I was doing my first overlay today and just built up the coats one on one as soon as the previous had stiffened up. As it was a flat panel I put it on with a roller, but I don’t think it matters what you use as any marks left by a brush would flow out due to the nature of the resin no?

SO I can just use the epoxy resin that I have? This was a epoxy resin that was recommended for wet lay up use and cures fast without a vacuum. Other resins which I have used do not completely cure if there is no vacuum applied.

SO whats the deal with the layer i have on now, should i sand this or not? If my layer of epoxy resin is not thick, won’t i damage the carbon? I DID in deed put an overly thick layer of resin on the part for this purpose.

Here’s what I was trying to wrap

Here it is in the process

After many hours fo work on this part, I have deemed it a failure. The material which has the resin in it, has popped off the part and never sticked. I tried to save it but, it looks terrible.

I’m going to have to strip the carbon fiber and everything and start over. I guess i got in over my head on this project. I thought wrapping the parts would be so much easier.

I think Im going to make any attempt to do an envelope style vacuum bagging and vacuum bag this part. I Should have at least put some heavy objects on top of it so help compress the fabric while the epoxy was curing.

Also, the surface before I layed the fabric ontop was sanded with 80 grit. I did this to make the surface rough and help with adhesion. I think I should have used a wire brush or something else to make the surface MUCH MUCH rougher.

Any thoughts or suggestions?

hmm wierd. maybe the part had dirt on it or something? maybe you should try cleaning it with acetone or something.

i sand my (fiberglass) parts lightly with some 100 grit dry, and overlay them with epoxy and carbon fiber. never had any problems.

fastrr when you re talking about grit sizes, are you talking about wet, or dry? i use wet.

Something that was weird: When i put the parts in 100degree temps. outside in the sun. I noticed that the material cured so hard that it wasn’t sticking to the part. Eventually causing air bubbles underneath the cf and above the part.

Im going to keep working on small parts until I get the hang of things better

hot working temperatures may cause some gassing off of the resin possibly faster than normal temps of say 75F.

I used epoxy on the overlay i did and it stuck great. I brushed a thin coat of epoxy onto the oem part, waited for it to get tacky then applied the carbon fiber/kevlar. This way there was less chance of the cloth lifting off the surface.

EvoDelta… about the coating procedure… i would say try it both ways and see what comes out looking better in the end. I sand inbetween resin coats because i noticed with my epoxy that there were strange “smokiness” in the resin when doing it that way all at once. But KleerKote suggests doing it your way with their product.

I definately won’t say there is only one right way to do overlays.

bigman’s how did the c pillars come out in the end? :slight_smile:

You can also make a cover this way… using an original part, wax it real good first then do your lay up over the part, bag and vacuum it make sure there is no bridging in the bag so the new part cover’s shape is not distorted.

I use a layer of fiberglass cloth say 4oz over the part, wet it out, then a layer of the cloth you want to be seen by people. Wet that out, release ply or peel ply it then vac bag it.

Once done use a sharp exacto knife or utility knife to trim the edges of the new part that have wrapped around the existing part. I trim them flush with the original part trying not to gouge the part. Pop the new cover off of the original, now you can spray on 4 coats of clear or clear resin, sand, sand, apply more resin if necessary, sand more, then clearcoat it.

Whalla… a new cover that can be stuck to an original. or you can reinforce the backside of the new part with further layers of cloth to make a new replacement part. If it is a replacement part, do realize the new part you made will be about .010" larger than the original. In most cases this does not matter for cosmetic parts.

This just saves time from having to make a mold.

My c Pillars were a complete failure. I put them in the sun after 24hrs of curing, to help them cure more. The carbon start to pop off the original pillar.

Also, my weave pattern was so unbelieveable distorted. I am very very disappointed in the way things turned out. I am experimenting with smaller more simple parts.

I don’t know where I went wrong with things. Do u know some good write ups on overlay work? I even purchased somenew epoxy resin for it. The epoxy resin was suppose to work for parts that aren’t put under a vaccum.

I want to vacuum bag the part, but through experience with similar parts. The whole pillar will bend and distor if i put any vacuum on it.

Any suggestions?

^^ wt heck:rolleyes:

Ok bigmans the reason your overlays are not sticking maybe that you are overlaying PP or PBE plastic… resin doesn’t like to stick to those plastics, it kinda partly bonds but doesn’t fully bond. Look for the letters stamped on the backside of the plastic part and then report back :wink:

many plastics resin won’t adhere to.