Please School Me On Polyester Resin vs Polyester Gelcoat

Hey Guys,
Forgive me for my beginner question, but the other day i was at the store picking up some polyester gelcoat and the lead composite guy asked me what I was making. I told him that I was making molds for the heel guards on my motorcycle. Yes, I could have just did an overlay and pull it from the part, but I wanted practice making molds.

Anyway, when I ask him for polyester gelcoat he told me for what I was doing I should just make the mold out of marine polyester laminating resin. So I went his route first. It was difficult to get coverage since the resin was on the thinner side that I had to pour the resin on and move it around rather than brushing it on. The second one came out in usable shap but wanted something thicker for the other side so I went back and picked up some red gelcoat.

With the gelcoat, since it is thicker, I was able to brush it on. A long time ago, I bought an LVLP gun with a 1.8mm tip that was recommended by that guy, but I need to do more research on spraying gelcoat.

But my question is, should I be making things out of the marine lam resin? Basically they are the same thing except the gelcoat has pigment to it?

Thanks in Advance

no…

gelcoat is a bit different. There’s multiple types as well.

The red type, also comes in black, is tooling gelcoat. Tooling gelcoat is thick as you pointed out, but also has more solids and is made to be more tough for a mold. It takes the heat cycling of a cure better and will resist scratches. I think ultimately it’s probably more brittle than regular gelcoat as it shouldn’t need to flex. A good mold will be very solid and 3-4 times thicker than the part.

And then there is gelcoat in polyester speak, or surface coat in epoxy form. Gelcoat should be applied either by brush or spray, aprox 14-17 mils thick and then left to cure until “tack free”, or until you touch it and leave a finger print but none come off on your finger. Gel coat comes in many colors from clear to black. The purpose of gelcoat on a part is to protect the laminate from weather and sun, to provide a durable surface, and to add color and pigmentation.

Using regular laminating resin for a mold is ok. We’ve all done it. As for the gelcoat… it’s worth springing the extra money on getting good tooling coat for the mold. The lam resin is fine for making the mold during the wetlayup, but it is not a good surface coat. The gelcoat will be much easier to get a nice finish from and will accept the release agents and allow a part to be de-tooled easily and cleanly.

Awesome. Thank you! Man I’m on a very steep learning curve and I love it! Thanks again!

That’s the primer I guess… I"m sure there’s much more to learn.

So whatcha making?

Making a mold for the heel guards on my motorcycle. One side came out perfect. The other side had a few pits in it. Think I just rush it instead of letting it cure naturally. Threw the second part in the sun hoping for a faster cure time of the gelcoat…such an idiot :frowning: Now I’m just gonna do the mold again since it’s cracked. Here’s a pic :frowning: That’s water droplets in the first pic btw :slight_smile: In the second pic, can anyone tell me why I got these cracks? This was done by brushing the gelcoat on.
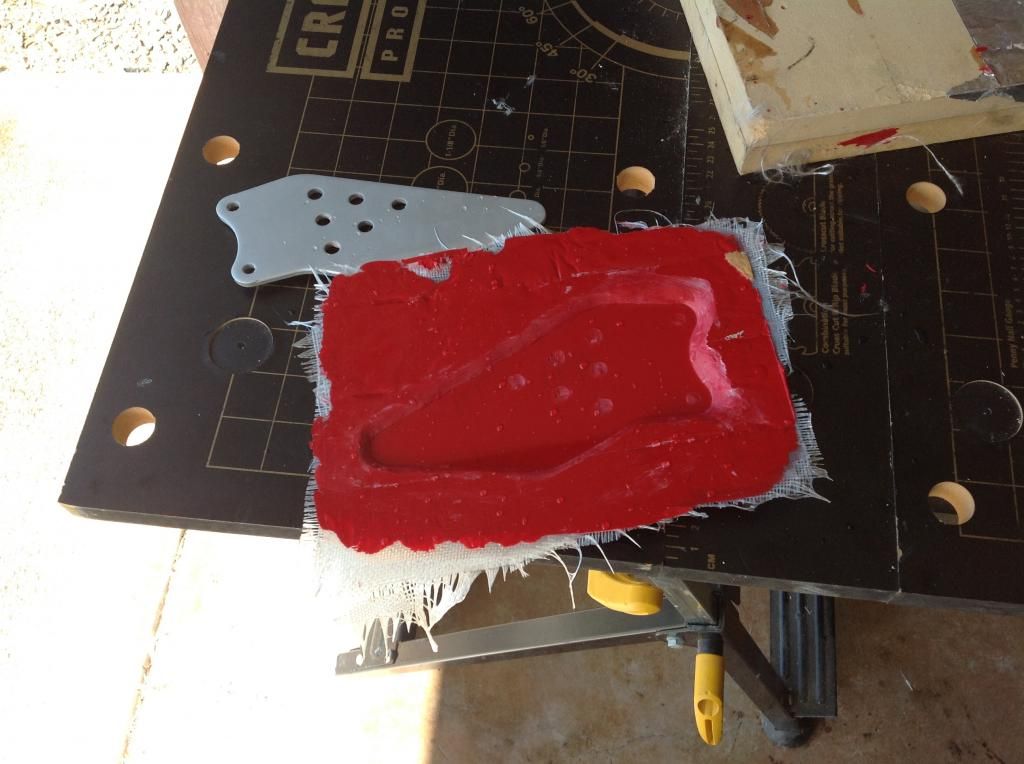
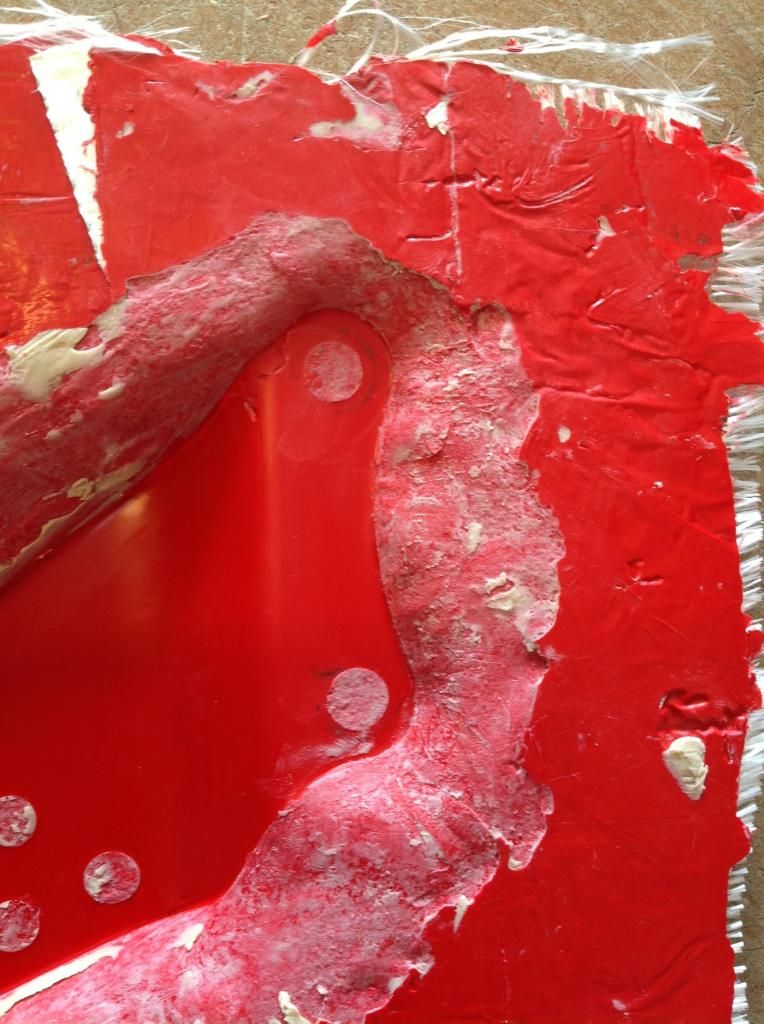
Thanks

I’m not sure I see the cracks your talking about…?

And be patient! Just let it do it’s thing, go drink a few beers or something. Don’t try to rush it with heat unless it’s super cold out. Also what ratio are you catalyzing at?

Is it the crack on the top edge of the part? Sort of looks like that was moulded from your part, but if not then did you have any issues with release? Looks like you may have had a small void under that area that caused the gelcoat to lift when you released.

One tip, spend a bit more time getting your flange nice and smooth. I used to rush my flanges too, I hated putting the time and effort into the part of the mould that was never going to make it to the final part. But a nice smooth flange does make laying up and releasing your part easier. Which, if you’re using carbon fibre at least, can be the difference between a nice cosmetic finish and a part with pulled weaves. Worst case is those cracks and undercuts can give you a mechanical lock and you either bust your mould and part getting it out, or you lose both completely.

The cracks are at the top of the second pic right near the button. As for the ratio, I had to calculate it out since the guys that sold me the gelcoat told me 1 quart gelcoat = 1 oz MEKP. And the MEKP bottle is a squeeze dropper so I had to calculate how much MEKP is in 1 single drop. For my project I only required 2 oz of gelcoat per layer, so I calculated the amount of drops I needed per per 1 oz gelcoat. Here’s how I calculated it…

  1. Looked up on the internet: 1 drop = ~0.002 oz
  2. 1 quart of gelcoat needs 1 oz of MEKP
  3. 1/32 = 0.003125 oz MEKP/oz gelcoat
  4. 0.003125/0.002 = 15.625 --> 15-16 drops MEKP/oz of gelcoat

My terrible math a few days ago came out to 11-12 drops/oz of gelcoat so I may have been undercatalyzing the gelcoat. Idk if this is much help…

As for the flange I’m still working on a good product to use. Right now I used a piece of MDF wood taped up with aluminum tape. Those lines you see in the gelcoat are from the separation of the two pieces of tape. Still trying to figure out a better system.

You should invest in a scale… Once you know the weight of your resin you can just get the percentage of MEKP to add. 1-1.5%

Doing that drop thing is too tedious and less exact. Can’t one drop be bigger or smaller? Controlling the amount of MEKP to a standard percentage will yield more consistency. You can get a cheaper scale and it’s at least something that will be consistent. I use a food scale at home.

As for the flange. You have the part on the MDF mounted, then use clay to fill in the sides right? Seems about right if you can do it. As for the MDF with tape… I don’t think you necessarily need the tape. If you seal the MDF and then release it you could go directly to the MDF. IF you’re worried about it sticking, because you don’t trust your release, then you can first wax it up, then put a nice coat of PVA on it.

Also if you’re having void issues, you can mix up a slurry to put down first. Resin with microballoons, fumed silica, milled glass. I usually will do this when I have any areas with sharp corners or I’m just paranoid about the voids. Sucks when you pull a nice mold and find voids that muck it up.

Sorry for the beginner question, but I was wondering what type of sealant would you use for the mdf? I was concerned with the part sticking and I knew the gelcoat would stick to the aluminum tape. I remade that second mold with a bigger flange area and it came out great. Now I have to look into vaccum bagging or infusion since the curves to me look too difficult to do a hand layup. But any suggestions would be great. Thanks guys!

Sammy, I’m curious, what do you mean by “slurry” I’m kind of confused. Also is there anything you can do to make the transition from part-clay-flange smoother? I notice on his molds and mine as well that the clay is not really “smooth”. I usually wets and and buff this part in my molds which can be time consuming. I only ask because you seem to have a lot of information. Thanks for the help.

I know a few things but, always learning more…

Yah i hear you on teh clay transition. It’s always a bit dull right? I figure that those areas are generally out of part, so they’d get cut off. IF so I usually don’t worry bout them. I’m not sure how to go about getting the clay smooth, other than sanding/buffing/etc. I guess if you really need an ultra smooth transition you could use a different material, but the clay works so well and is so easy. There are other plasticine clays that you can get from Chavant

http://www.chavant.com/new_site/index.html

the have some clay that is hard and will nearly be polished smooth when cleaned up but, needs to be heated in order to be malleable enough to work with.

Other wise… I guess machine the plug or make the plug up nice then coat it with some gel coat. I’ve done that with plugs and if the plug is sturdy enough to be sprayed then polished, you’ll get a nice shiny mold.

As for slurry… I mean mixing fillers into the resin to alter it. By adding in fumed silica, micro balloons, and milled fibergalss you can thicken up the resin so it will stick in tight radius and with the fillers, will also have enough strength to make useful sharp edges. I’ll make slurry when I have areas that I’m concerned will have voids, like a sharp corner. The slurry fills these areas where the cloth will have a hard time conforming to the shape. Plus the slurry will help to connect the first ply to the gelcoat.

I usually spray on my tooling in two sessions. First session at 20 mills, second at 20. If I can get 25 I do 25. This way when its curing obviously a few mills flash off, and then sanding and buffing removes a few more mills. I’m usually left with 30 - 40 mills thickness. Excellent for buffing and polishing without thinning it out too much and seeing the resin behind.