moulding without bridging

I have come to the conclusion that the way i have been making molds is incorrect as far as the flanging goes.

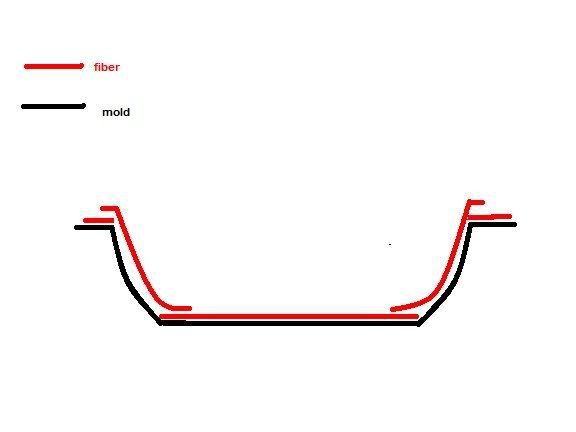
My flanges are 90 degrees to the mold/part cavity. This is causing bridging and dry edges along the edges of the part near the flange. So when the part is trimmed to size there are dry edges there or seriously bridged or bubbly edges.

I’ll put up a drawing of how i have been making my molds, and this has proven to be a problem when making the parts. The picture will explain.

I post this so no one else makes the mistakes i have, or if you are having the same trouble you now know why that is.

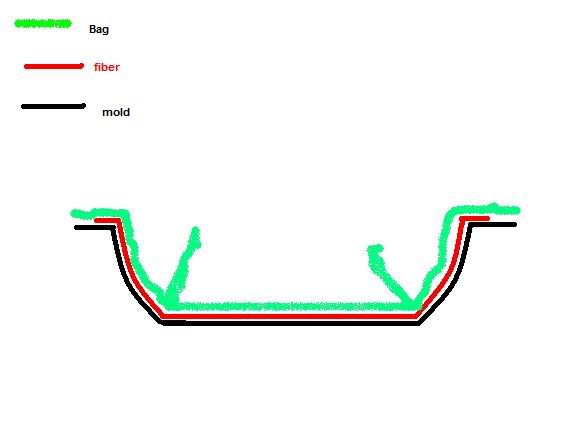
What is happening, I think, is the bag is wanting to pull down tight on the laminate before it can take proper shape to the mold… oncee that laminate is sandwhiched in between the vacuum bag and the flange there is no way for the laminate to be pushed down tight against the mold cavity, so bridging happens and dry bubbled up areas occur on the cured part.

Above was an example of how NOT to do the flanges on molds.

Here is the way i believe is correct. :slight_smile:

The green lines represent the flanges. The black line represents the female mold cavity. the light blue line represents an extention of the flange for vacuum bag taping only, no laminate on this surface, the blue flange area is just optional if you like to tape on a horizontal surface to make baging easier. The red line represents the cloth/resin laminate.

In my theory the laminate should have no dry edges with this type of flange/mold. Also bridging would be eliminated. My drawing is not perfect as you can see i got the mold and flange lines on the right side crooked by mistake.

On your last drawing. It may be a little hard to get a part like that out of the mold. Especially if someone messes up the mold prep.

Another way to avoid bridging near the flange is to use a plasicine fillet, or, sheet wax with 1/2" radius. I mean to do this during the mold building process. Any radius smaller than 1/4" you will have a hard time to get cloth to behave.

Avoid bridging by making sure the fabric is pressed into the mold well. Apply partial vacuum, work the fabric down, apply the rest. one way is to vacuum, release, vacuum, release, etc to make the fibers relax into the mold.

Dry spots are just how it infuses :wink:

flanges on the top, are easier to get the part out! Unless you mold in a handle to pull the part off!

Yeah buddy, took me a few goes before I figured that out :o

Flange should initially follow the line of the part… it’s easier to flange it down flat like you’ve been doing, but the edge of the part is pretty much doomed (and I agree, it appears to pull the fabric causing bridging that you wouldn’t otherwise get).

if we’re talking about a simple bowl shape like this, i think the flange is pretty straight forward, which is, like the first picture you drew. I think when you have bridging and dry edges, it’s more on how you lay your fabric and how you bag it.

If you were bagging this … i would leave a lot of extra bags all around the area. And not only that, i would place all those extra bags to where there is changes in the elevation of the surface … or where there is recess/depression etc … kinda like this …

But if you were doing wet lay up or pre preg w/out the bagging … i would overlap the fabric where there is no elevation changes in the surface. Fabrics dont like sharp corners … so i would lay it up like this …

and try to avoid overlapping fabric where there is change in the surface … like this …

sorry if these all seems kinda basic, maybe the noobs can benefit from this …

yeah RiNaZ, those are good points, but for the second 2, it depends on the part. if the part is structural, then the break in fiber can cause the failure modes to start there. Composites like having long fibers throughout the entire part, else you will crack and break the sides easily. ESPECIALLY if all layers have the seam in the same place.
If one does have to do it like that, offset the seams at least 1/2"min each time. (stagger the seams so they aren’t on top of each other) for each ply.

But yeah, work the fabric down in the corners with extra bagging material. Always good.

yes you’re right riff42, good point. I was actually writing in reference to the example that was given, so whatever points or tips i write here is based on the picture. Different shape requires different advice. And im quite certain a lot of people here dont do anything structural.

The fact of the matter is, a lot of structural stuff dont have a flat surface so it’s hard for you to not break the fabric. It all comes down to your lay-up schedules.

You can have a one piece fabric from flange to flange on this example (i know i would use a one piece). But you have to be good with your bagging technique. So if you have problem with bridging and dry edges, it’s just better to not use a one piece and have different layers overlap each other.

David, I encountered this problem on a few parts earlier on, and it was remedied when I stopped placing the flow media over the edges where it’s not actually required. This prevented the formation of gaps and areas of minimal resistance for bubbles that are continually pulled out of the infusion to travel along. All my molds are made with the flanges at 90 degrees, some even less.

Oh the bowl shaped mold drawing is just a simple example… the molds i use are much more complicated shapes.

Rinaz is right… making the flange parallell ( in line with the lines of the parts for at least the first 3/8 inch (10mm) is the way to go. this is because the resin does not want to fully infuse properly on a sharp radius at the flange area. I mean most of the molds i have made so far have a 90 degree flange right off the part shape and that is where the bubbles collect from the gasses and air being pushed thru the flow medium and laminate.

The partial vacuum, push and release, push and release is a good method that i understand will work :slight_smile: Also like you guys said getting the cloth down tight to the mold surface everywhere is critical for a good part.

Andrew is right also… having flow medium in 100% of the mold on these tight multi-radius molds will just kill the job. flow medium will bridge on tight corners. So the trick is to skip those tight corners, just come as close as you can to them with the flow medium. Also having the flow medium go up over a 80 degree or more flange angle will cause problems I think.

the molds we are building now will extend the part edges up 3/8 to 1 inch, then a 80 to 90 degree flange from that extention.