Mold Repair and proper finish questions

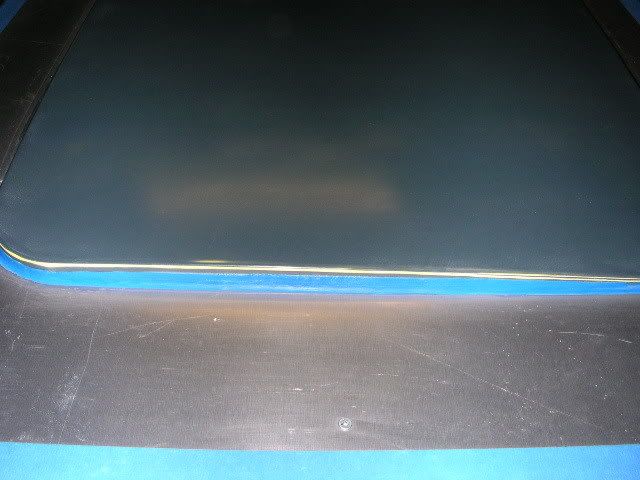
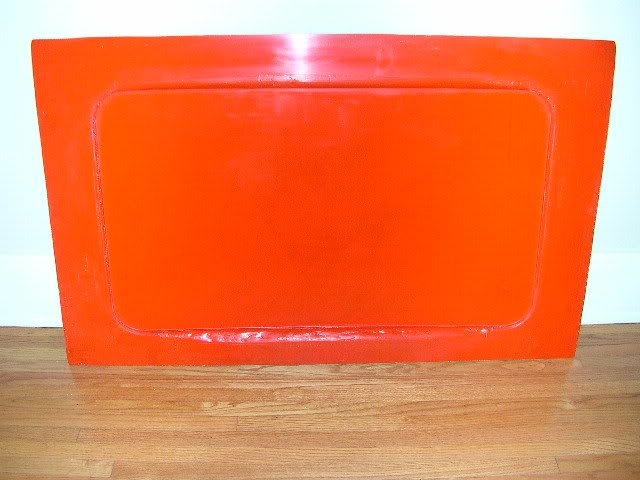
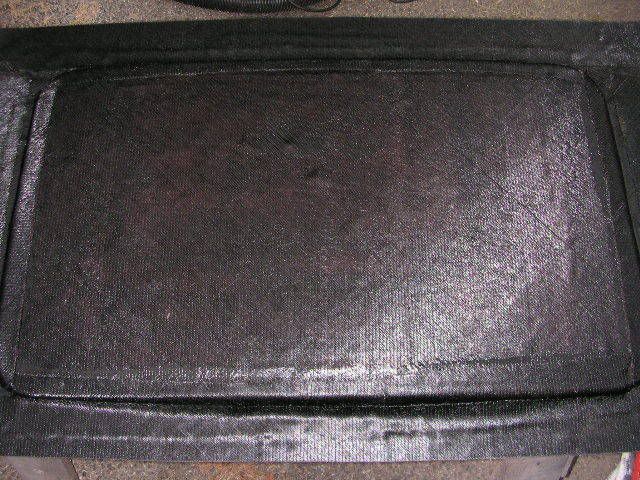
Pictures are of a mold that i had someone else make for me. He said that the mold was ready to go and that i could start laying up the carbon fiber.

After close inspection i see tons of flaws in the mold and i am wondering what are my options.

I am trying to figure out if i need to have a new mold made?

-----OR

If i can repair this existing mold.
Here are two of half a dozen pictures i have:

As you can see. The issues are the gaps between the actual part and the mold. Can i fill these gaps with Bondo and the bondo actually holding?

Is there a type of liquid filler that i can inject through a plastic needle to fill the spacing? Bondo was wayy to heavy to get through the needle of the dispenser. Can i make the bondo more viscous somehow?

Do you think i should have a new mold made?

I was also told from others that the mold was not strong enough and that i would need re-enforced it, so that i can tape the bagging directly to the mold (instead of an envelope style mold).

If the bondo can hold, i want to lay up a prototype in fiberglass to make sure all the contours and dimensions work well. If not, i was thinking after i bondo i could add another layer of fiberglass to make the surface layer stronger, then spray a new sealers and final coat to have a new strong finish. My only worry with this idea is, the dimensions of the final product will be slightly smaller because of the change in the size of the pocket on the mold.

I would say it’s good, but if it’s not the time needed to make that mould usable is going to mean that making a new mould would be a better option.

Wax it properly, layup some glass, and infuse. Then decide if the parts aren’t right. In all likelyhood the mold is perfect, unless it’s been damaged.
The mold appears to be fine. The “gaps” mentioned are normal from the clay flange put on the plug, and are in areas that will be cut off anyways. There’s no damage visible on the pics, they’re just lines from wrinkles in aluminum tape. Again, not part of the finished piece. And the edges are plenty strong to seal onto, as it appears the flange is like 6" wide.
The important part of the mold is where the layup for the finished piece will be. Do you have pictures of the whole mold?

I agree with TET. That mold would probably work.

I would love to see how they shaped the fillets on the plug. Definitley didnt use a fillet shaper.

My guess is that it’s just a rolled piece of clay…no shape just clay.

What TET and JRL have stated but I have heavily modified molds (the orginal had riveted on sheet metal to overlap the door skin to the 1/4") with drilling holes, apply Bondo and working it until I had what I wanted…then rough sand and gel coated the whole mold. Let it dry and sand and polished it. They work great.

I think I also have step by step pictures of that too for the PPV section but man, I’ve been too busy!:o

Bigmans, Do you have a photo from a distance showing the whole mould?

The plug had a curve to it, and needed clay just to fill the gap. The gelcoat on the mold could be sanded to make it smooth if desired.

The surface is just fine. Polished to a high gloss, and waxed before delivery to seal it.

Overall the mold is very good. For $150, it’s a steal. Unidirectional and non crimp fabrics used, and vinylester.

Yeah, didnt think of it that way.

Now that I see the full pictures it doesnt look so bad. For $150 thats a bargain. Fillet shapers from freemansupply.com would make a huge difference on the fit and finish.

TET: Where did you get the blue clay?

Andy is this you?
I have tried so hard to reach u why havent u returned any of my phone calls.

The mold is not Perfect or fine in anyway. What isnt shown in the pictures is how the lip of the Panel sits higher than the mold edges.
Also, the rolled over corners start wayy too early. Again, the lip of the panel is too low and widens and flares out too much.

To act as a plug in the roof, the mold would work. For a functional piece that has the same dimensions of the panel this mold is not going to work.

I did lay up a piece and the panel did not fit at all, so i know this for a fact.

I am correct things now. Dont get me wrong. The mold does have some nice features and with a little work, should pop out successful parts.
I think if the walls are straighten more everything will work fine.

ANDY: I dont know why you have avoided my phone calls and emails the past year. There are no hard feelings and i was or am not upset with your work. Whenever i contacted you i thought i had some interesting and helpful offers that you could benefit from. I never contacted you for my business or for my personal benefit.

I think i gave you a hellva of an opportunity to work with a formula team that you were obviously not interested in. By gones are by gones…


Its difficult to see exactly the gap. Notice that my panel is Yellow, the mold orange. There is some spacing between the panel and the mold.

The tolerance on the final piece are very tight.
When i layed up the material in the mold before i started fixing it (the way u see it now). The width of the panel was much larger than it was suppose to be.
I tried to highlight the sections with neon green paint in my MSPAINT.

The problem with the mold that i didnt see at first was exactly what most people are thinking. The lip of the panel sticks up higher than the flawed or rolled out areas causing improper fitment.

Also, to comment on the TET’s comment stating: “At $150 this mold is a steal”

In my opinion. If the mold doesnt produce the part that it is SUPPOSE TO, then it would not be worth it…

You can also get imported fillet shapers from Harbor Frieght tools too!

SWEET!!!

I like the ones I use at work (freeman) but there a little to expensive for my home use. Thanks for the tip!

Hmmmmmmmm…I dont know exactly how one would make the mold 1/8" too big dimensionally. Hard to do that. Thats very peculiar to say the least. It most likely is the correct size.

I will, however, say that I wouldnt touch building a mold like that for 150 dollars.

Maybe…maybe 600 for that part. Its way too much time and money in materials.

So this I will tell you, it seems in this case you got a lot what you paid for.

I’m sure whomever made that mold intended it to be exact (again I cant figure out how they could have made it oversized…)but if they only charged you 150 for it, the price is asininely, rediculously cheap.

An obvious point indeed. But now take this into consideration:
I said: “take your time, build it right the first time. I dont care what it cost” I was billed $150 from the mold creator (apparently a moderator on this forum).

I have made a video to show the flaws in the mold. After a little bit of bondo work, i am thinking that i will lay up this part once again in fiberglass to experiment with the fitment.

The original plug does not even fit into the mold before the Bondo work. I will lay up a part just to show everyone who is blaming me or in a sense accusing me of being the bad guy

HERE IS THE VIDEO: Click here to watch moldproblems

is this mold for a roof cap? and is the part too big or too small to fit?

After measureing the mold seems to be an 1/8th too small

Well your video isnt working so I dont know what youre talking about.

In any case I see that you have an “air” gap between the 90 degree flats of your panel and the flange.

Why you have this problem I cant figure out at all. In all honesty I cannot fathom how someone makes that happen unless it was the flange making doing the dirty business.

Regardless of how it happened I dont know that there is multiple moderators on this board and I dont know whom you contracted with to do it BUT instigating an argument online isnt a good way to problem solve.

It may or may not be a bad deal and for that I sympathize.

You may be able to fix it but I am guessing that its gonna need so much work that youll need to have a new mold built.

Now, if you want to contact me with your part needs and a time line I may be able to help you out with getting it redone and a couple pulls out of it for ya.

Other than that…I suspect you are gonna need to find someone else to redo it.

well, if this is a roof cap, and its too small, that makes sense. because anyone who would make a roof cap needs to take in account for part thickness, that means you need make the plug bigger by whatever the part thickness will be made, so if the part is 1mm thick, you would need to take in account for this. it appears that the mold was taken directly off the roof, this would be ok if the part you were making was for a replacement roof, but otherwise you would need to laminate your plug first with the desired laminate, finish that and pull a mold of that plug. giving you a part size plus 1mm for laminate thickness.

I didnt even think of that…is this a cap to glue over the actual part?

Was it made as an overlay or a replacement?