Infusion Failure 3,4,5,6 - Need More Advice - Getting Very Discouraged

hey guys,
So I’ve been trying the infusion 6 times and out of those 6 i only got a semi decent part. As some of you know from the previous post, I was having trouble with the polyester resin. A few days ago I bought some systemthree mirrorcoat epoxy (700 cps) and switched from using my polyester laminating resin.

Setup:
1.5 cfm pump
Mold–>Peel Ply B --> Flow Media (airtech green) -->Bag
Degassed epoxy

Attempt 1: Polyester resin, mold, peel ply b, flow media bag - disaster nuff said
Attempt 2: Polyester resin, mold, peel ply b, flow media bag - decent part, but many tiny bubbles in resin: instructed to use epoxy
Attempt 3: Polyester resin, mold, peel ply b, flow media bag - waited to long and polyester resin cured in line
Attempt 4: Epoxy resin, mold, peel ply b, flow media bag - see below
Attempt 5: Epoxy resin, mold, peel ply b, flow media bag - infused properly, pending results
Attempt 6: Polyester resin, mold, peel ply b, flow media bag, envelope bagged - see below

On my first attempt with the epoxy (Attempt #4), I added the wrong ratio of part A to part B so it gelled before it could get infused. Today, I put in the correct ratio (Attempt #5), and it seem to flow through nicely, but I have my doubts right now about it.

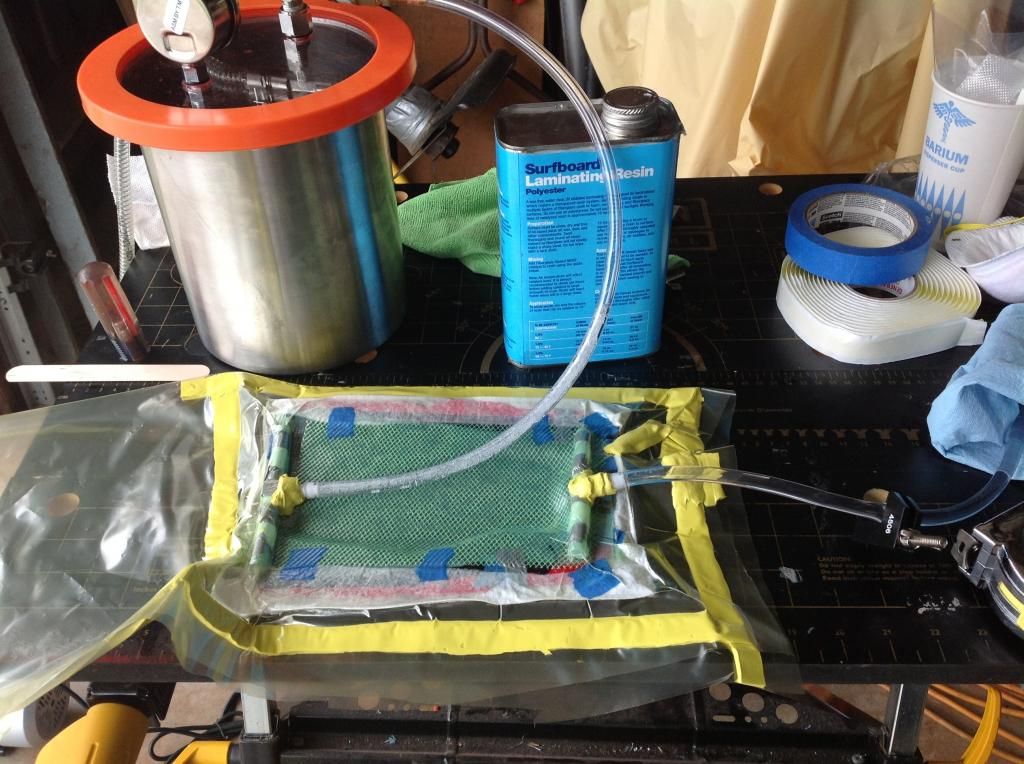
Also, I did what sammy said and for kicks, did a gel test on the polyester resin. I was able to double the amount of time to ~20 minutes working time using 0.5% ratio of MEKP to polyester. So I made a second infusion today (Attempt #6). This time I tried envelope bagging that mold. So it went great, pulled 28.5 mmhg. I have been making so many mistakes, I have the little parts down. So I was able to degas the resin. As I infused it, it looked like my first attempt where it looked like it was infusing to fast and there was a lot of bubbling throughout the part as it was infusing. Since my mold was small, I was not able to put the resin outlet line away from the infusion mesh. It was almost touching the mesh. Is this the reason for the massive bubbling while infusing and I noticed in my resin out line, half of it was filled with resin. The time I made a decent part, I barely had any resin in the line. I used the same 3 oz today as I did on that decent part.

I’m getting very discouraged and exhausted guys. I seem to take one step forward and two steps back.

Any help would be greatly appreciated. Thanks

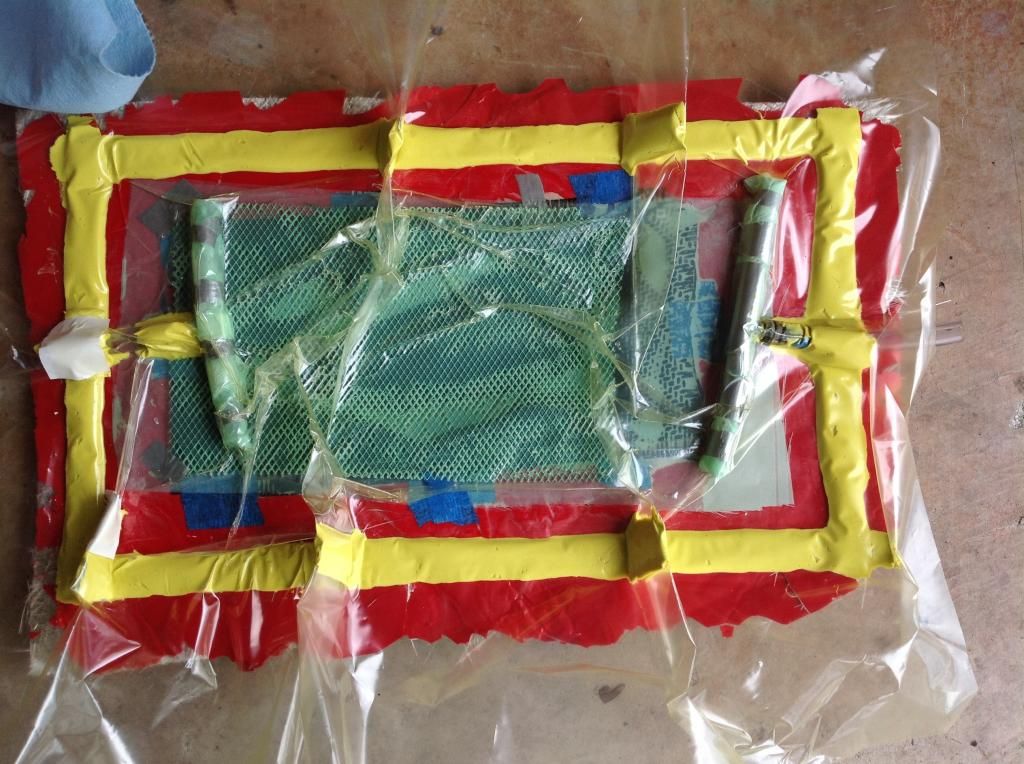
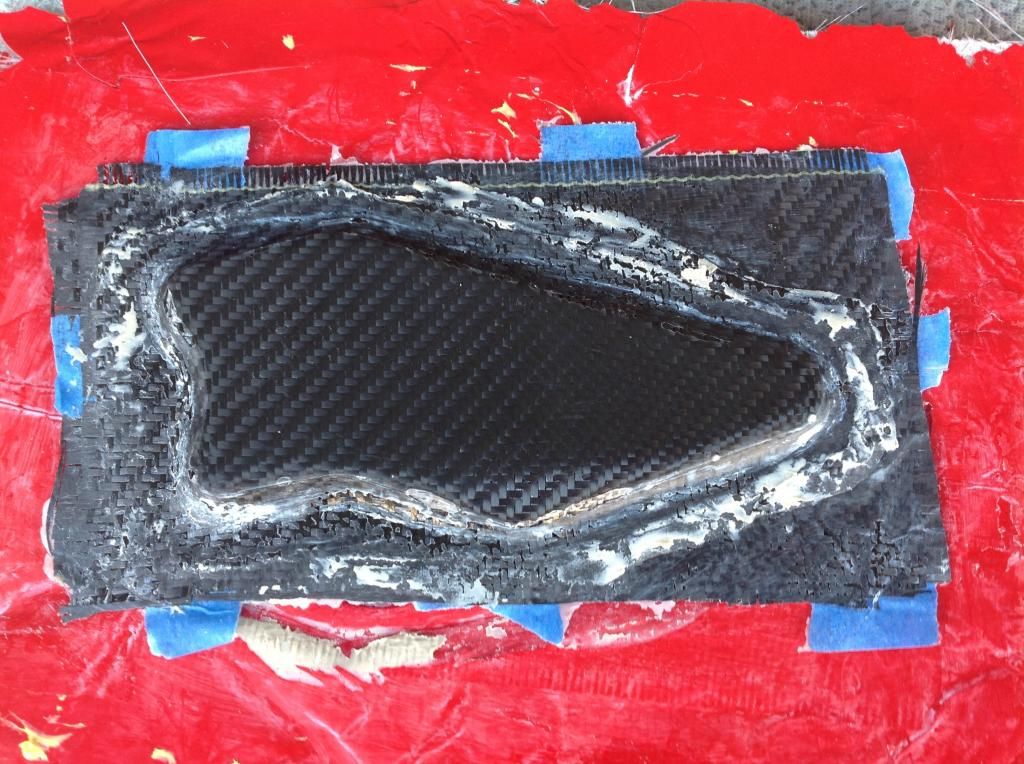
Attempt #5

Attempt #6

Now that you actually have a decent vac level now the water in your catylest is boiling… A low water cat is now needed. Reducing vac level will eliminate this boiling also.

Since a low water cat is out of the question, do you mean not running the vac at 28.5 mmhg? Or do you mean when infusing, slow the rate that the resin is infused?

It’s odd because I did the exact same thing on the previous part and did not have the problem. The only difference was that my resin outlet was farther away from the mesh (used a different mold).

I’m stumped…

Personally I think your mould is too small for infusion. It’s making things cramped and messy and I remember how many problems that caused me when I first started. I think you would do better to make your mould again, neater and with bigger flanges so that you have space to put everything. That said, that probably isn’t priority number one, your current mould should be useable. I would just redo the mould once you have got you resin troubles sorted out.

A couple of things are jumping out at me from your pictures. Firstly I think you should change your approach to the infusion. You are trying to draw the resin along the length of the part, and although your part is small it is always good practice to draw the resin along the shortest distance. If you are having trouble with pot-life then this is something you should change, and position your spirals on the long flanges of your mould so that the resin travels the shortest distance.

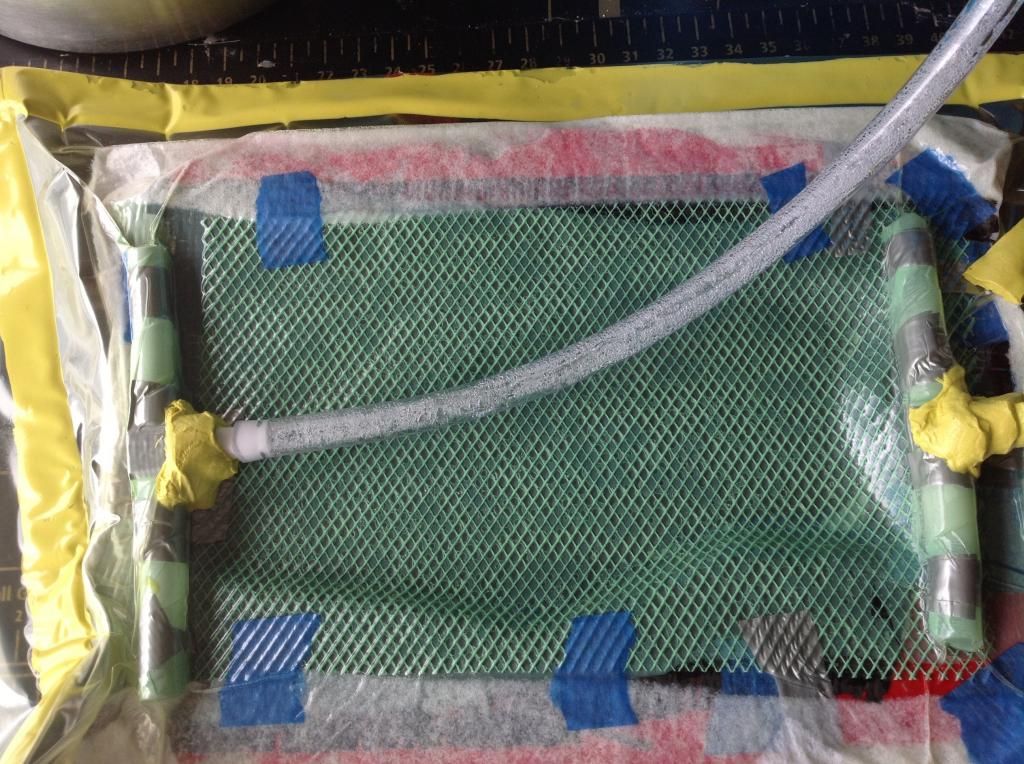
Another thing I see is that there are a few areas that look like they are bridging. This is possibly due to the mesh. I would advise doing the mesh in a couple of parts, firstly using your plug as a template to cut out a piece of mesh the same shape as your part but slightly smaller so it sits inside the edges. Then cut 2 strips the length of the part, and place both of these under your RESIN INLET spiral. Don’t worry about making this mesh touch the mesh on the part, have it stop at the edge so it doesn’t have to go around the corner, the resin will flow short distances like that without a problem. I don’t think you should have any mesh under your vacuum spiral, instead wrap the vacuum spiral in peel ply and place it on top of peel ply. I’m not sure if your mould is going to be big enough to give you much of a brake zone, but you should try. Also don’t have any mesh along the flanges on the sides of your part. You want to control the resin flow so that it goes through your part, not encourage it to flow around the edges.

Finally, to me it doesn’t look like your bag is sealing nicely. I can see areas in your sealant tape that I would be suspicious of on one of my parts. Are you doing a vac-drop test before trying to infuse? Are you TOTALLY sure that you have a 100% air-tight bag? If it’s working for you then ok, I’m just seeing places that look like potential leaks to me and in my experience if something looks like it could be leaking then it probably is.

Lastly, I think stick to the epoxy. Perhaps my lack of experience with infusing polyester makes me biased, but I hate polyester at the best of times. Epoxy is much easier to work with, and I think you should be able to get a result with the stuff you’ve got as you got it to flow through your part once so it must be possible. Get your mixes right and don’t rush things, if you’re too tired to do the math then stop and do the part tomorrow, rushing will only lead to errors.

Those are some places where I would start. In my experience, infusing parts is a lot like spray painting and the key to success is in your preparation. Did you ask your local store about their Aluzine resin, what viscosity it is?

Hey Hanaldo. Thanks for the continued advice. When you say you see that my bag may not be sealing properly, can you give me an example of a location that seems suspicious? I notice I initially have a leak, but find the leaks. No hissing sound even with my stethoscope. I’m thinking it may be the clamps causing slight leak (using brake hose clamps).

Ok so I got impatient and after 5 hours I pulled the polyester resin mold. The part seemed ok except for the one corner that didn’t get pulled down. Also, the resin did not wet out the two layers of 5.7 oz. it barely got to the surface. I’m not sure about why it bubbled twice in my infusions and dint in one of them. I was reading that under vacuum polyester resin tends to boil. The pic looks nice, but that surface is literally fabric with a dab of resin.

As for the epoxy, ill open that one up tomorrow and see.

Keep the great advice coming…thank you

Are you doing a vac drop test with your gaug? You need to. Don’t rely on your hearing to tell you if there are leaks, even with equipment like stethoscopes. I’ll get on the laptop and draw some arrows in Paint to the areas I would be suspicious of.

Then, are you clamping off the Vacuum hose when the infusion is complete?

Yep, I do a vac drop test. It holds, but eventually loses pressure over time. Aside from spending $300+ on the leak detector, I can’t seem to find the micro leak that I always have. I don’t hear it and I spend all my time pushing down on the tape. Maybe it’s my actual mold that isn’t sealed? Or is it my brake hose clamps that need to be swapped out for those vise grip looking clamps?

As for infusing, I leave the pump on all the way until the resin sets and a little extra. Once I can tell that the resin is setting, I turn off the pump. So usually I run the pump for 2 hours before turning it off. The polyester resin I’ve been using has a working time of 10 minutes @ 1% catalyst. The epoxy set at 50 minutes.

Thanks Hanaldo

Ok, couple of problems there too. You should clamp off the vacuum line when the resin reaches the spiral. For a cosmetic part, leave the resin feed open for 30 seconds or so after you clamp the vacuum line, then clamp that off too.

Spend more time getting a good seal on your bag, this is very important with infusion. Personally I think your small mould will be contributing to the problem as it makes things tight and cramped and hard to find the space to make the bag neatly. If you had another 2 inches on your flanges everything would be that much easier and I bet you’d find it easier to get a good seal. If you’re any good with electronics, ultrasonic detectors are a very simple circuit and quite easy to build. I built mine for $25 and it works like a charm:

If you absolutely can not get a good seal on your bag then you should double bag before infusing. You can’t infuse with a leak and expect a perfect result. I have drawn some arrows on your picture where I can see areas that may be problematic:

The one on the right stands out to me because the mastic has not been pressed onto the mould surface. This tells me that you haven’t pressed down on this area looking for leaks, and I find that these corners where the mastic overlaps itself is often a source for leaks.

The top right and the bottom left arrows stand out because they are wrinkles in the bag, another common culprit. It does look as though the mastic might be totally against the bag here, but always go over and press down on these areas from multiple angles to really squish the mastic around.

At the top left arrow I can see a crease in your bag that has gone over the mastic. Again it’s possible that the mastic was sealing this, but creases and wrinkles in the bag really are your worst enemy so go over areas like this really well.

In addition to the areas the I marked, I would also be suspicious of every one of your pleats. You have not pressed the mastic up into the tops of the pleats very well, leaving lots of possible channels for air to get. Remember that your leaks are small, it only takes a very very tiny gap between the mastic and the bag to cause your issues. Don’t assume that just because you can’t SEE a gap that there isn’t one, you really have to jam the sealant tape as tightly as possible against the bag. Spend the time doing this because once you infuse, any leaks are going to destroy your part and you’ll waste a lot more time having to start again.

Hey Hanaldo. Thanks for the advice.

Another problem. I pulled the epoxy part off. It released fine. I have little areas on the corners and the flat surface where the resin did not soak through at all. Again the part is very flimsy since the epoxy did not soak through the to layers of 5.7 oz carbon fiber. Yu can see a piece that the epoxy didnt soak at all in the upper left corner of the part. Am I I infusing to fast? The infusion looked good yesterday when it moved across the media. I am so lost since now I’m also having the problem of the fabric not completely wetting out.

This is likely due to the viscosity of the resin, OR because you are leaving the pump on with the vacuum line open, drawing too much resin from the part. My suggestion would be to try again, but this time clamp off the vacuum line when the resin reaches it. Leave the feed line open for 30 seconds, then clamp it off.

If the part improves but still isn’t fully wetted out, you may try again and leave the resin feed open for longer, say 45 second to a minute. Otherwise, or if you don’t see any improvements, it may just be that the resin you are using is too thick to wet out the fibres and you need to find a lower viscosity resin.

All in all that part doesn’t look too bad, you’re getting closer. Definitely a lot of bridging happening too, so I suggest cutting the infusion mesh as I mentioned earlier and really massaging the fabric into those corners and around the edges.

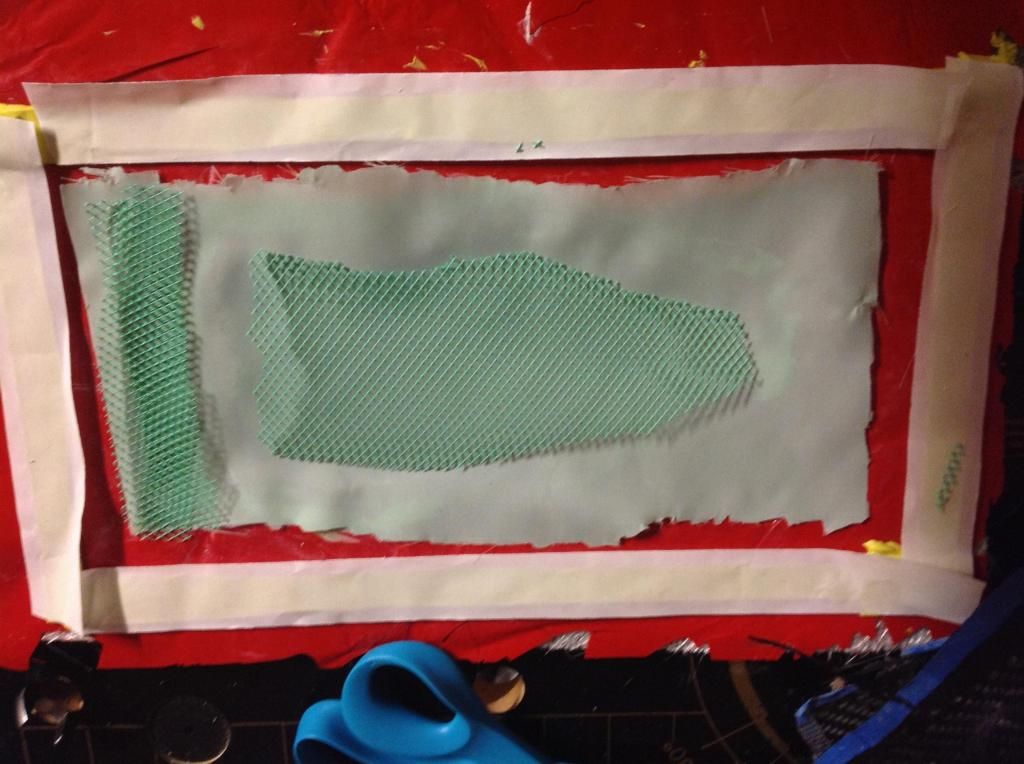
Thanks Hanaldo. I’m currently prepping things for tomorrows infusion. I think I understand your previous advice about cutting the infusion mesh to the area of the part. Below is a picture of a mock up of the peel ply and infusion mesh setup. Resin INLET goes on those two strips of mesh and the outlet will be about 1.5"-2" away from the mesh. Let me know if it isn’t what you were talking about. Sorry, I have to infuse the longer distance. While pulling off the tacky tape, it actually cracked my mold on the bottom side so I didn’t have enough room for the vacuum outlet (little less than 1"). So after this, I’m gonna redo the mold making it longer on the top and bottom side so that I can infuse the shortest distance.

As far as the bagging goes, I’ll try and press all my areas better and not have wrinkles in the bag. Sometimes when I’m laying up the vacuum bag, the bag falls on the tape and gets stuck on there so I have to just use it and seal it up more with tacky tape. The problem is still the same. I can’t get a good 100% seal and even envelope bagging doesn’t do the trick. Maybe it’s all in the tape that is causing the leaks.

I find the sealant tape is the problem 99% of the time, it’s just a pain to find where. Spot on with the infusion mesh, that should help with your bridging issues and hopefully help the resin flow… What vacuum bag are you using? If it’s Strechlon 200, you should cover the edges of the mesh and spiral with peel ply.

Thanks again for the advice. I just woke up so I will be infusing a little later today. As for the bag, I’m using Richmond HS800. If there’s any last minute advice, ill be checking on here frequently. Ill post results shortly.

Thanks again!

I think your infusion failures come down to three things:

  1. impatience
  2. improper seal
  3. improper materials

You’re getting frustrated and discouraged because you keep failing, but you still don’t have the proper setup to have success, which is only going to lead to more failures and frustrations.

I think you have the understanding of what it takes to do this correctly, so I don’t think its a matter of not being smart enough or not having the ability. Once you get it right the first time, you’ll be good to go.

So lets stop for a few minutes, take a deep breath, and dive into this again so you can start making good parts.

First and foremost, I see in quite a few of your posts you tend to rush things.

You don’t have a proper seal, but you infuse anyway. You do a drop test for a few hours, and it fails, but you infuse anyway. You don’t have the correct epoxy, but you infuse anyway. You parts haven’t had time to fully cure, but you release them anyway. I get this, especially now that you’ve failed a few times. You’ve had some issues so you REALLY want to get it right, but I think that’s hurting you.

You need to slow way down and come to terms with the fact that you will not make good parts overnight. Patience is key. Once you start to plan things out, double check everything is correct, and then, and only then, start to infuse, you’ll start making good parts.

Let’s next move to your seal. You need to stop infusing until you have 100% seal. This will eliminate the majority of your problems.

Since your mold is small, lacks good flanges, and isn’t that great, I’d suggest getting a thicker sheet of glass or aluminum that is 2’ x 3’ (Home Depot, should be $20-30) and practice infusing on that until you have the proper technique down. Using a larger sheet and doing say a 12" x 12" square of carbon (or even 6" x 6" square if you’re worried about wasting material) will give you at least a foot of room on each side of your material as a flange. Extra room for proper placement of the inlets, spiral, tape, etc. It will also give you extra room to do a second bag on top of your original bag. The second bag should not deflate if you have a proper seal on the original, but will act as an insurance policy.

Once you get your sheet of materials ready, I’d suggest you take a look at how you’re sealing your hoses. Your brake clamps could be the issue. Try bending them in half and clamping them that way. Try using 4 clamps and clamping them each a second time.

Do a drop test and leave it overnight. If it doesn’t fail, awesome. If it does fail, keep trying if until you’ve got a proper seal. Check the weak spots, like inlet lines into the bag, corners, and pleats and double check them until you’ve got it right.

Leaving the pump on during the infusion process is not a substitute for a leak free system. It’s also going to draw out too much epoxy and make your part resin weak.

Lastly, I still think your epoxy is a big problem. While the Mirror Coat is probably thinner than poly resin you were using, its still not a proper infusion epoxy, and is probably too thick for your needs. It also has a working time of about 40 minutes which is way, way too fast for your climate, especially if you’re using a small pump and degassing. It’s more than likely starting to kick before its completely flowed.

While you’re waiting for your drop test to work, you need to spend some time trying to source some suppliers that can get you what you need, instead of just making excuses on why you can’t use the good stuff because of your location. Its going to involve some phone calls and some leg work. You need to go to manufacturers websites and get their list of distributors. For example, ProSet sells a couple of different infusion epoxies (you probably need the thinnest one possible with the slow hardener). ProSet lists Epoxy Sales Hawaii (808-220-2986) as a distributor, so they should be able to get a proper infusion epoxy. Some people like Gurit infusion epoxy, and Gurit lists Force Marine (808-969-1010) and Carbon & Fiberglass Sales (808-870-7000) as distributors. When you call these people, talk to them, tell them the problems you’re having, they’ll be able to help you and suggest what works best for your unique climate. You might even be able to get them to give you some samples to work with at no cost or at cost. Granted, you won’t be able to easily order this stuff online and you might have to wait for a bit for it, but once you have proper, infusion epoxy, you’re going to see a dramatic improvement in your results.

Hey asuc. Thanks for the advice.

I was thinking that sometimes it is better to take a step back and reevaluate the situation. I initially made these molds not fully understanding why it needed such a large flange area. Sadly now I know and need to recreate the mold along with finding a better flange material for the mold.

I think the first part of the technique that I need to address is getting a 100% vacuum seal. Without it, there’s no point in going any further. I’ve tried to bend the hose in half along with the brake hose clamps (both ends), but still had a decrease in vacuum so I’m leaning more to the bag that might be the issue.

The epoxy issue, still working on it. Trying to source out the epoxy so I’ll give those places a call. I went to the store the other day for advice since I’m at a point that is a little beyond what I’ve been researching but came up short. They didn’t know of anyone in the state that does infusion. Seems that everyone down here vacuum bagging, but I’m sure there’s others. They just told me to trial and error basically.

On a side note. Since the flange area of my molds is way to short. Instead of dumping the molds in the trash, could they be used for vacuum bagging instead of infusion?

thanks again

One other thing I would recommend is to start simple. Use a plate of glass as your work surface and infuse a 5x5" sample first before going into molds and complex forms. This will dial in the infusion fundamentals and keep material costs to a minimum.

I would also have the flow mesh continuous from the resin inlet to the part.

You should also note that the viscosity of resins is not everything.

Polyester resins are slipperier than epoxy and will flow better but that aside any infusion resins should be specific for infusion.

You should also monitor the temperature of the mould and resin so that everything is within a suitable temp range. A cold mould or cold resin will slow the flow down considerably as well as affecting your gel/cure times.

OK guys, I’m almost there. I completely envelop bagged the entire mold since I was having troubles getting a leak free open face mold. I was very meticulous with sealing the bag tjhis time making sure to really press in the gum tape. Achieved a 27.5 mmhg vac and did a 30 min drop test. The bag held so I went on and infused. I just popped the part out of the mold and no air bubbles, voids, or pits. Woohoo!

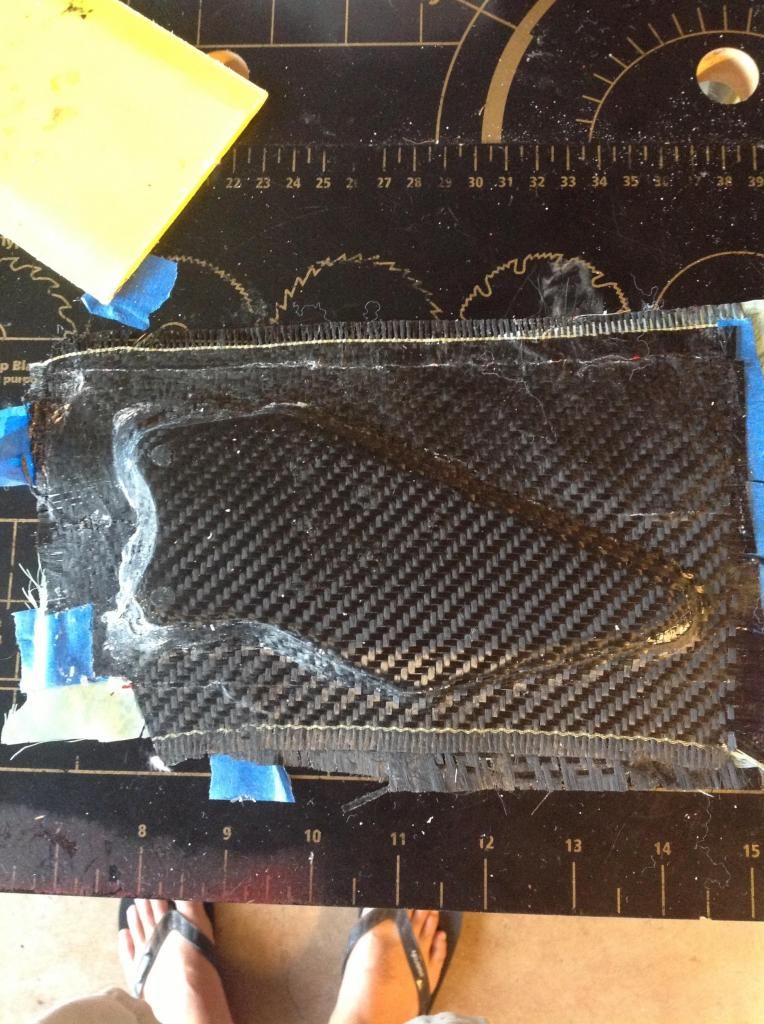
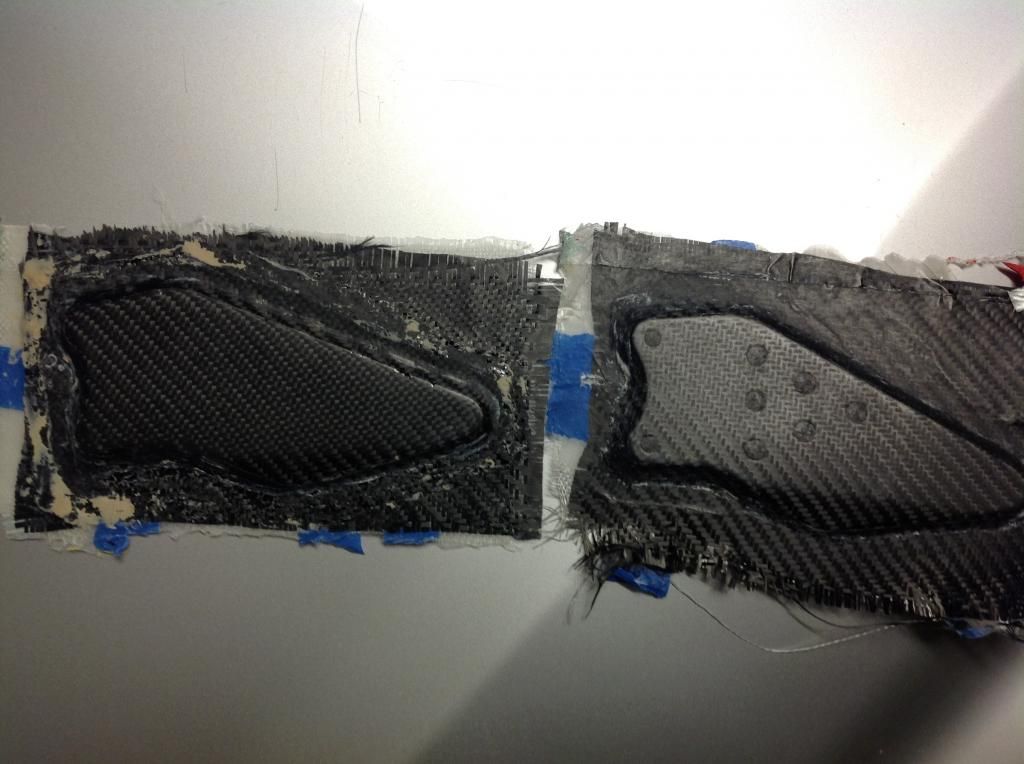
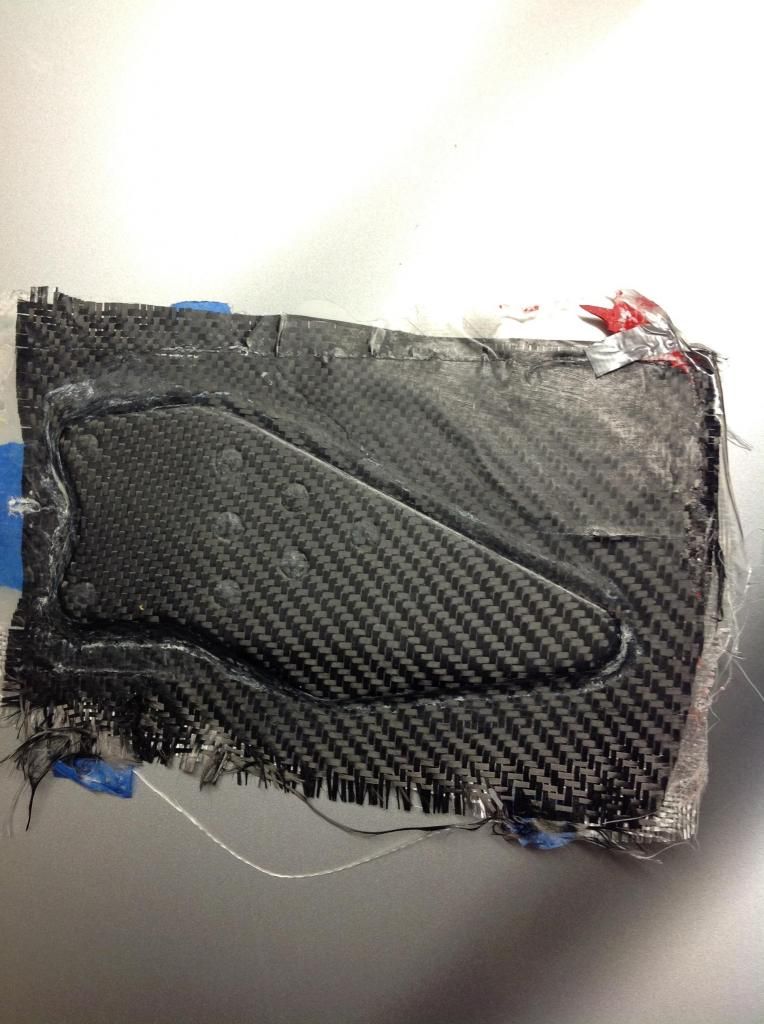
But…the carbon looks like it was barely wetted out on the surface. Is this due to using polyester resin and it’s too viscous that it’s not wetting out the carbon fully? See pics below. I ran out of the mirrorcoat epoxy, but since I was able to achieve a leak free bag, I went and infused the polyester resin.

Epoxy on the left(failed attempt but just for surface comparison) and polyester on the right

Polyester Resin Closer Look


As for my resin search. I got in contact with all the companies you all have helped me locate in Hawaii. All of them do not carry infusion resin. One company told me that they can get the pro set epoxy, but it would take a month and would require me to buy a gallon (total $200+). The other company doesn’t stock the resin locally and told me it would be too costly to get so he wasn’t able to help me. Another company said they do not carry resin research rr series so they only carry the ce series (1000+ cps). So basically my only option was to wait a month until I found a mainland company willing to ship me a gallon of infusion epoxy for $135. If the viscosity of the resin is causing the issue I’m going to order it tomorrow.

Thanks for all the advice and support so far!

$135 for infusion epoxy is pretty good, if you’re planning on doing more of this then I say order it anyway.

That last part is a pretty solid attempt mate! You’re getting there. Did you try my suggestion of leaving the resin feed open 30 seconds longer than the vac?

Hey hanaldo. I went ahead and ordered the infusion epoxy. Have bigger molds made and ready to go.

But I’m going to try and remake the part tomorrow using your technique. On this attempt, I infused the resin and right after it the resin passed the part, I clamped the resin feed line. I left the pump in for 2 hours after. Luckily though it just made it past the part before it started to gel. Without the flow media, the resin moves extremely slow through the peel ply until it reaches the next piece of flow media. Ill post results tomorrow of the results. Since I only have polyester at the moment, I want to see if it is the resin viscosity or technique that is making the carbon surface look dry.