How have things turned out for you?
I have constructed new silicone bladders with intensifiers molded into them, which has helped a lot. The new bladders are slightly smaller than the mold, so they match the interior dimension of the laminate. So far I have been wetting out the material, inserting the bladder and placing the mold in a vacuum bag, followed by inflating the bladder. I may switch to prepreg to see if that will solve some of the issues I’m having with hand layup. Here is a pic of the more recent results, still have a few small voids and pin holes, but it’s moving in the right direction.

good to hear!
Are you still using the smooth on product?
First bladder was made using Smooth-On Dragon Skin, but have since switched to their brush on vacuum bagging silicone, seems to be working great so far.
Do you have some photos with your bagging silicone application. Dont want to make a fault using this idea , your experience may help here…
Same as in this pic, but the bladder is slightly smaller than the mold surface.

I’m in the process of getting back on my silicone bladder project as well. Compositeman- how many uses are you getting out of those bladders? I assume you are making them by laying sheet wax in the mold to replicate the laminate thickness, carefully bushing both halves, and the putting them together and waiting for cure?
Also, what temp are you curing at? I am planning to do aluminum molds with a fairly hot cure temp to get parts in and out in about 2.5 hours. I would assume cure temp and bladder life are going to be directly related.
Current mold construction is epoxy and glass laminate molds using wet lay up and a mild 150 F cure temp. The bladder is easily removed when collapsed using vacuum. So far only 10 parts have been made using these bladders, but no damage yet. I will be attempting the same process on aluminum molds with cure temps around 300 F, we will see how they hold up.
For constructing the bladders, I used a old mold that had been cycled to it’s limit. By laminating multiple layers of 5.6oz glass to obtain the interior dimension, I can make bladders on a separate mold without the need to stop production of the final molds. Both halves are brushed on separately, then a bridging bead applied to each side and the mold closed. The mold was room temp cured and then post cured in the oven, cooled and demolded and instantly put into production.
Could you explain this step :'The bladder is easily removed when collapsed using vacuum".
I’m pretty sure that he means that once the part is cured, he pulls vacuum on the bladder (instead of positive pressure). This vacuum will suck the bladder in on itself (collapsing) and away from the insides of the part. And then, once collapsed, it will be easy to pull out of the part.
Maybe it is possible to find any link with same process on video ? This is not straight tube,and 1 piece item,this is why im asking.
I searched for this recently and there is no useful video on making a carbon fiber stock anywhere on the Internet.
There is plenty of videos with people making car parts or bike parts etc but nothing with the same difficulty and complexity as making a rifle stock.
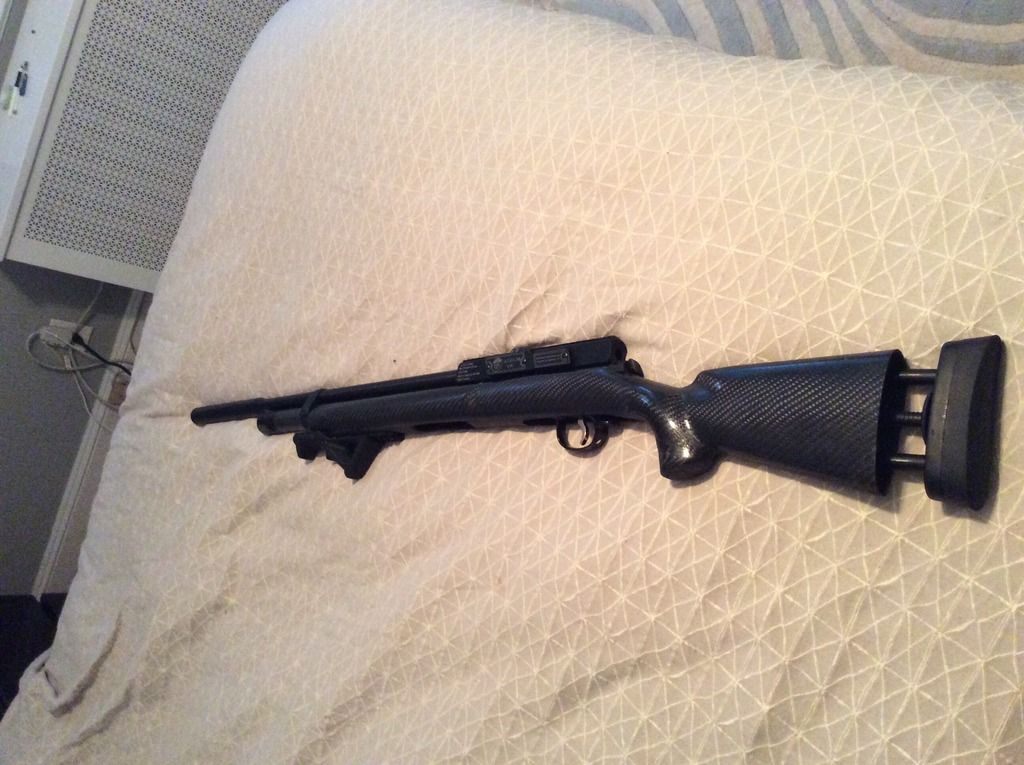
I had to figure out my own process from scratch. I was only doing it for a DIY air gun stock (I don’t do this for a living) but mine came out better than the one in this thread. This was my first attempt:
I made it with no vacuum or bladder and I got no voids at all. It was perfect. I have made 3 more since.
The “voids” in the pics are trapped air in the resin. It has to be removed before laying the CF in the mold. You can not remove it after the lay up without destroying the weave.
I recommend working with a faster resin too. Those slow resins may seem easy as you can take your time but they also allow too much time for more air to get trapped in the resin after you tried to remove it.
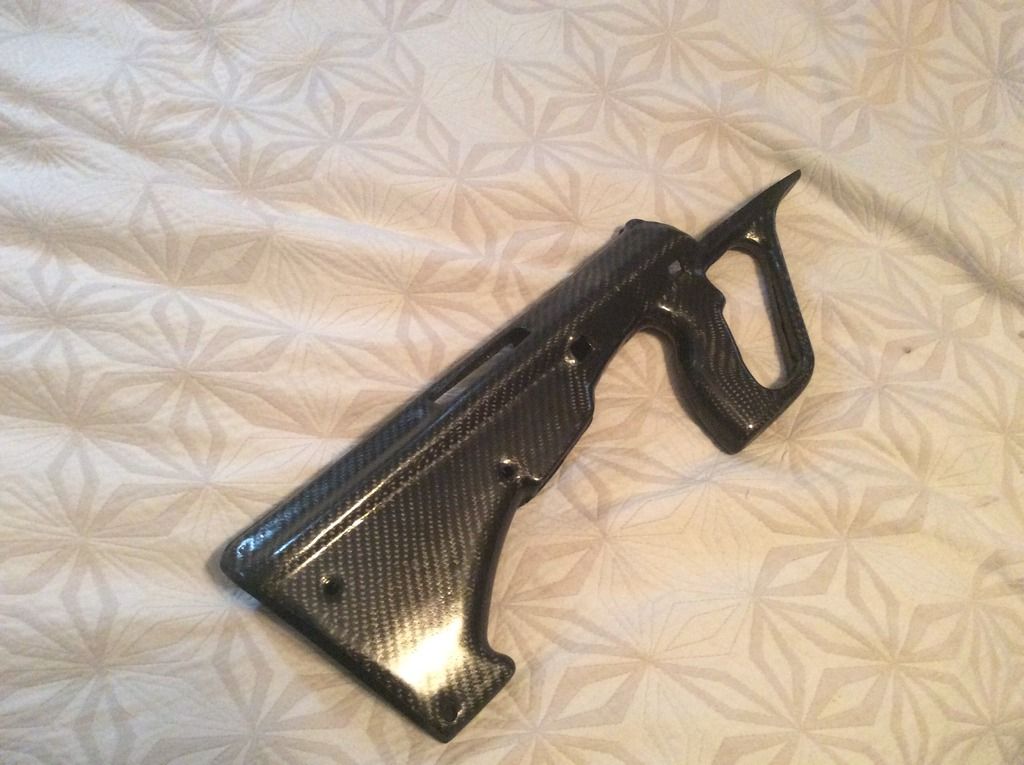
This is another CF stock I am working on:
Note how this one has more complex curves. I used the same process that I created for the other stock and still no air bubbles or voids.
I would trash all of those silicone bladders and vacuum bagging films. They add so much time and cost for very little reward for complex parts. It just isn’t the same as making car hoods or bike frames. Those are easy.
If I was doing this for a living, I would use compression molding for cosmetic pieces. If it was a painted stock, I would switch to a carbon fiber sheet molding compound for the surface layer. Steyr use it for their high end cf stocks. It makes them strong in every direction.
Hi Zebra,
Congrats on the success you have with your method. I, personally, would love to know how you pulled it of? Maybe it is there between the lines for the figuring out - I just haven’t been able to;-). Thing is, I might set out to make a speargun with some of these techniques soon.
Is your stock one piece? You don’t use a bladder nor vacuum which leaves a mandrel or compression molding but how to do that DIY for just a few pieces, I am super curious about.
I really like this thread as Compositeman has been super open about his process and people have given very good, specific advice along the way.
You are correct that I did not go through the details of my process. I only commented about how trying to remove excess resin and air once the cf is laid up in the mold is the source of the issues described in this thread.
On choosing techniques for just a few parts, my experience has been that you always get out what you put in, so there aren’t many short-cuts because you want to make one instead of 100 parts. The only saving is cash because I would use less expensive materials if my tooling didn’t need to survive multiple pulls.
For complex shapes, I use compression molding. It’s actually better for short run or diy projects as no additional equipment is needed. I just use my female mold to cast a rigid male insert and compress the cf between the two using clamps. It works if done right.
Compression molding is a technique for holding the cf in place - Espiecially for complex shapes but it won’t prevent surface air bubbles on it’s own. I only use it if there is tight small corners. For the first stock pictured it wasn’t necessary as there were no tight corners. I made DIY prepreg and it stuck to the mold surface without issues.
Learning to make your own prepreg gives you a lot more control over the process. My prepreg is significantly higher quality than most of the overpriced commercial stuff. I pre-seal it with all the air bubbles removed before it gets anywhere near my mold.
Most problems occur when people try throwing a bunch of dry cf into their mold and start stabbing slow cure resin into with a paintbrush. They then wonder why the final part looks a mess with all the fibers pulled out of place with voids and air bubbles everywhere. They then try to sand away all their mistakes like it was wood and end up with holes everywhere and a pile of black dust. It doesn’t even sound like it might work, does it?
The best advice I could give anyone (pro or DIY) is take enough time, do every step properly and use the right materials for the job. Every time you try a shortcut or a quick fix, you will waste all your expensive material and have to start again. Every project requires that you put thought into the process. Someone else’s process won’t necessarily work for your part.
There may be some trial and error needed before you design a process that can work. Anyone looking for a quick and easy project should probably try a different material as cf is none of those things (if you want a nice cosmetic finish).
Also, apply resin with a squeegee with the cf on a flat surface and get all the air out before the lay up. A paint brush should get nowhere near dry cf fabric.
Finally… Choose your pattern wisely. Some patterns are going to be impossible for someone with no experience to recreate in carbon fiber. You want gentle curves with no right angles and if possible, avoid long flat surfaces (as they will bow).
If you are making a speargun, I highly recommend using the Mako speargun handle frame (so you can use AR grips). You can then purchase a simple aluminum channel on eBay and use that as a simple mold for your carbon fiber. It will save you a lot of trouble. I did exactly that and it worked well enough. I’ll see if I can find pics to post.
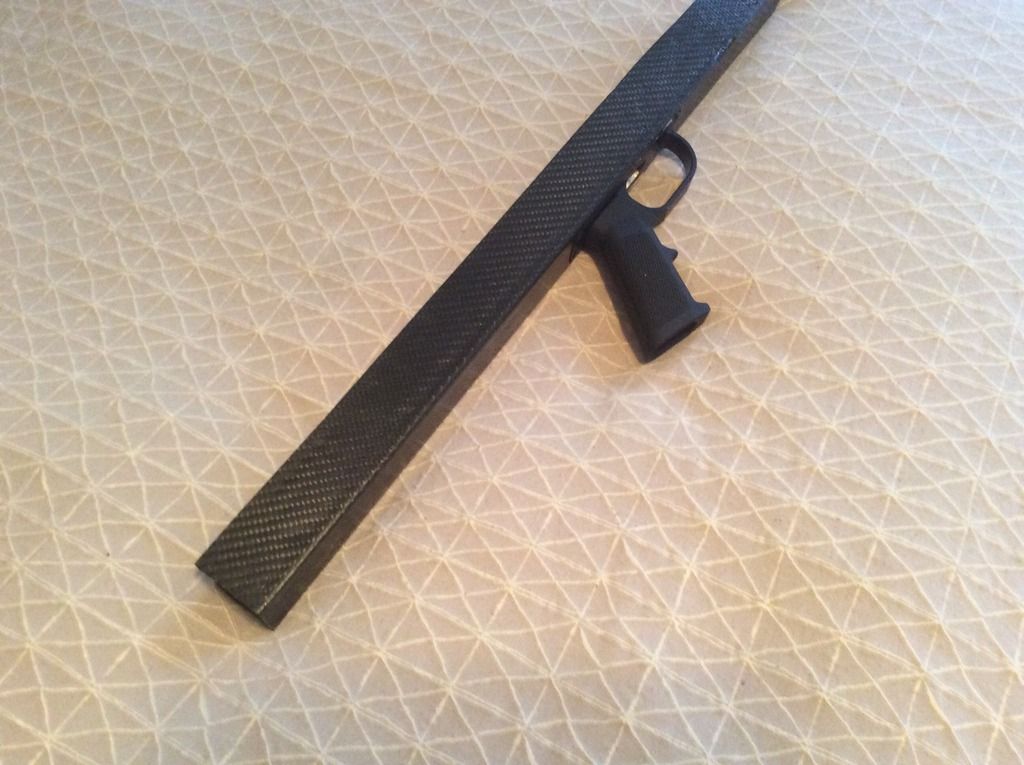
This was the cf speargun chassis I started making a few years ago using the Mako handle frame:
My technique wasn’t too good at the time but it did the job and wasn’t too hard to make. It’s not a bad beginner project.
@Zebra, thanks so much for elaborating.
I might pick your brain further down the line as to what you use for your compression mandrel and if you line the mold with wax first, when you make the mandrel. But for now, I will likely make the first barrel over a male foam plug and dissolve the plug after the laminate has cured.
In reg. to the speargun handle, I do like the AR15, but it wont really work for me as I will be building a pneumatic gun and the trigger mech is a bit different in those. Also, I want to push the handle up really high and by not using e.g. the AR15, I can find a few mm;-)
Thanks for the idea, though.
The mako handle frames are designed to operate a separate trigger mechanism via a trigger rod (like a bullpup). This means you can use any trigger you want and place the grip wherever it is comfortable. They sell the triggers and trigger rods at the same place they sell the handle frames.
I’ve used the Mako frames on precharged pneumatic air guns. I had to trim off some metal to make the triggers fit as they are a little too thick.
I would advise against trying to lay carbon fiber over a foam core without a mold. You won’t get a good finish. I would suggest wrapping the cf round a pvc or aluminum tube and taping some plastic film around the tube so you can slid the CF off easily when it’s cured. Make sure you wrap the outside of the cf with smooth release liner so you end up with a glossy smooth finish.
Can’t use tube as mandrel - I’m going for a cuttlefish shape;-)
Also, I have had cf tubes made to spec for pneumatics before but I wanna step it up;-)
I’ll reconsider the AR15, but for the design I have in mind I’m not sure I can make it work. Thanks though.
Sent from my iPhone using Tapatalk
Also, I’m not too worried about surface finish at all. This is more a proof of concept thing at this stage.
Sent from my iPhone using Tapatalk


