I am assuming the gelcoat didn’t tripe. First off check that the vent hole into the cup lid is clear.
A couple of observations :-
That pattern can occur with a bucket gun if the pressure is too high for the gelcoat viscosity, or the gun is too close to the job for the pressure. The air just pushes the gelcoat around on the mould surface and causes ridges. Seems like the distance from the tip to the job was within specs, from your notes. The small fan can be caused by the gelcoat being thinned too much and hosing out instead of spraying. Pole guns behave in a similar manner. The fish-eyeing can be caused by very thin ( low visc ) gelcoat and a thin film. It disappeared after you built up the thickness. So my first guess is that the high gloss additive is the culprit. Your cup gun should be able to spray tooling gel with out thinning. Besides, I can’t imagine the additive improving a quality tooling gel.
Ten waxes … can’t blame you for being over-cautious there, and that shouldn’t cause a problem.
Greg
As always, many thanks for the tips & advice!! Below is a link to the datasheet for the orange tooling gel coat that I have on order from Fiberglass Supply:
http://www.fiberglasssupply.com/pdf/gelcoat/945ToolingInfo.pdf
Yes, I do have a wet film gauge (Herman) and this time I purchased enough gelcoat to allow me to run a few tests with differt nozzle sizes & lower air pressure before re-spraying the actual plugs. Re ASB’s thoughts that too much air pressure pushed the thick gel around on the surface and caused the ridges - this theory seems the most logical to me. There are a number of videos online showing the G100 cup gun in action spraying gelcoat but not one of them says anyting about the nozzle size or air pressure used for the video.
This all makes making an epoxy mold sound easy. 
As for tooling resin:
The type which changes colour (from brownish shiny to yellow dull) has a polymer in it, which compensates for the shrinkage of the resin. This only happens when a certain heat is reached. Thatis why you need (usually) 4 layers of 450 CSM (1.5 oz) wet in wet.
If your plug cannot stand that heat, simply do not use that type of resin. Use VE resin (build up slowly) or epoxy resin. (with matched gelcoat and fiber)
Ugh… Is there a serious downside to using the PE tooling resin that I purchased (click link below to see datasheet) if I can only apply 2 layers at a time (2x layers has a tested peak exotherm of 150) due to concerns of the exotherm being too high?
http://www.shopmaninc.com/specs/spec404.html
I will prepare two test laminates today (4" x 4"), one with 3 layers & one with 4 layers of 1.5oz CSM and measure the peak exotherm. Logic says I should be okay so long as the peak exotherm is somewhat below the HDT of the VE resin used to construct the wing, do you all agree? Example: If the HDT of the VE resin is around 220F and I can keep the peak exotherm of the PE tooling resin below say 180-190F.
Also, is the higher exotherm going to negatively affect the tooling gel coat? The HDT of the orange tooling gelcoat that I purchased is only 120F with room temp cure (I assume room temp to mean 75-80 degrees F) unless post cured for three hours @ 150 F in which case the HDT is 203-212F (link to gelcoat datasheet: http://www.fiberglasssupply.com/pdf/…oolingInfo.pdf ) My ambient temps are 100-115F outdoor so the surface of the wing sitting in my hangar (measured) is usually around 125F (due to radiant heat from the metal roof of the hangar) so I’m thinking the gelcoat will have a higher HDT that a typical room temp cure but not quite the max listed in the TDS.
Bottom line: I ordered 2 gals of the PE tooling resin so I’m hoping it will be okay to use the stuff even if I can’t lay a full 4 x laminates at time. The other factor is the limited gel time thus I don’t think I can get 4x laminates down before the stuff gels anyway. I was able to get 2x layers down no prob but even 3x might be a challenge due to gel time.
Thoughts?
Today I tested a couple of different batches of my PE tooling resin with different laminate thicknesses. Follows are the results:
Ambient temp = 105 F
Catalyst = MEKP
Laminate dimensions = 4 inches x 3 inches
Batch #1, 60 gram, catalyzed at .9% (point 9)
Gel time = 15 min
Time to peak exotherm = 28 min
Peak exotherm w/3 x layers of 1.5oz CSM = 152 F
Peak exotherm w/4 x layers of 1.5oz CSM = 158 F
Batch #2, 60 gram, catalyzed at 1%
Gel time = 14 min
Time to peak exotherm = 28 min
Peak exotherm w/3 x layers of 1.5oz CSM = 155 F
Peak exotherm w/4 x layers of 1.5oz CSM = 162 F
Even though the test laminates were small, I believe the critical factor for exotherm is thickness of the laminate. Even if the exotherm of the mold laminates is 20-25 F hotter due to the larger size (thickness will be the same as the four layer test laminate) the max temp will still be well under the HDT of the vinylester resin used to construct the wing (actual dimensions of the mold laminate will be approx 32 inches x 24 inches) so I should be safe. Do you all agree? Note also that there was only about 10 F temp difference between the 3 and 4 layer laminate so the deciding factor (3 or 4 layers in one shot) will likely come down to how quickly I can apply the laminates before the resin gels… 14-15 min gel time means I’ll need to apply each layer in under 3.5 min or less.
Also, I’m still wondering about the HDT of the gelcoat and if this is going to be an issue or not… see my earlier post.
Please advise,
Read the datasheet, this is not a rapid tooling system, so you are good (even better) to lay one layer at a time. No need at all (and not desirable) to lay 4 layers, you do not need (or want) the exotherm, as there are no shrinkage compensating polymers in this resin, which means you need to keep things cool to keep thing straight.
I would definately apply 1 layer at a time (perhaps with a tad more MEKP, 0,9% is on the very low side, even at 105F), and after 2 or 3 layers, you can start with 2 layers.
Thanks Herman! I think I have a good handle on spraying the gelcoat & laying up the molds now (I’ll post some pics when done)… Hopefully, my new materials will arrive by mid next week so I can get started.
One last thing I’d like an expert opinion on: I’m thinking about building a DIY oven (via wyowindworks design) to post cure the molds AND then later the parts that I will be building in the molds (postcure before demolding). For the molds I will need to build an insulated enclosure that fits the wing… then a stand alone oven for that will fit both molds.
Do you all think this is a good idea? If so, what temp ramp up schedule, max temp, max temp duration, ramp down schedule should I use?
- The gelcoat TDS says to post cure at 150F for 3 hours
- The tooling resin says to post cure at 250F for 2 hours
The HDT of the vinilester used to construct the wing is approx 220F so obviouisly I cannot ramp up to 250F as per the tooling resin TDS so what do you all recommmend? Should I default to the lower 150F post cure temps for the gelcoat or go slightly higher?
My ultimate goal is to end up with a finished part (inner landing gear doors) that wont warp/deform over time. Again the gear door layup schedule will be CF, CF, CF, 1/4" roacell RIMA51 core, CF, CF, CF (possibly a layer of eGlass on each side to give me something to sand before hitting the CF).
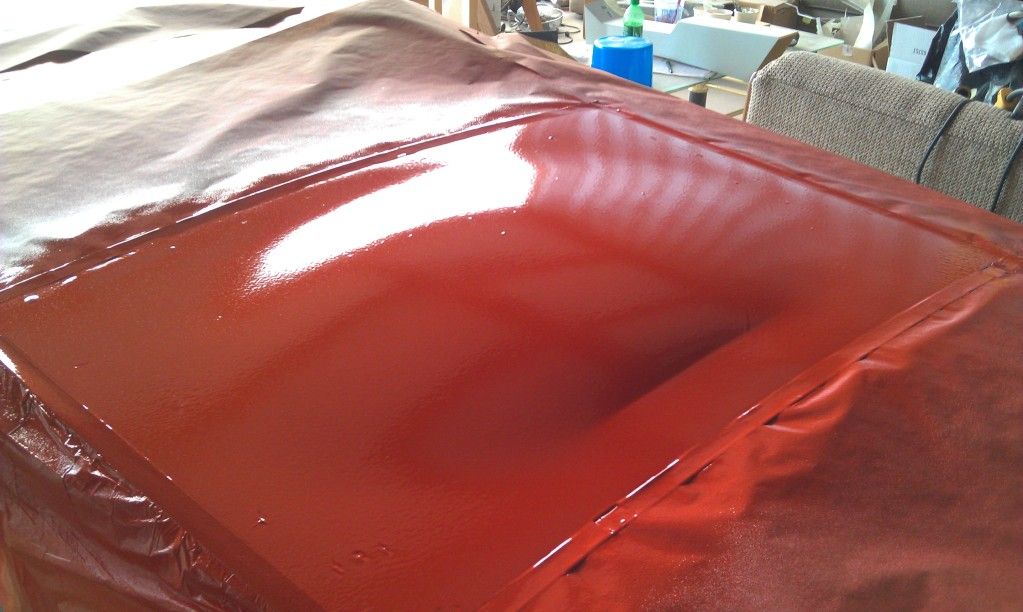
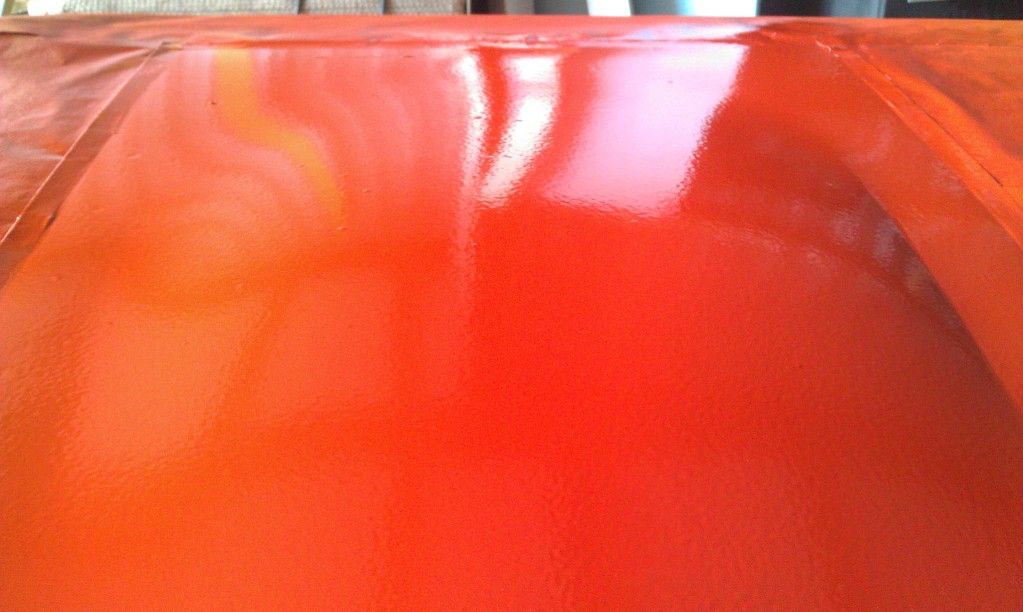
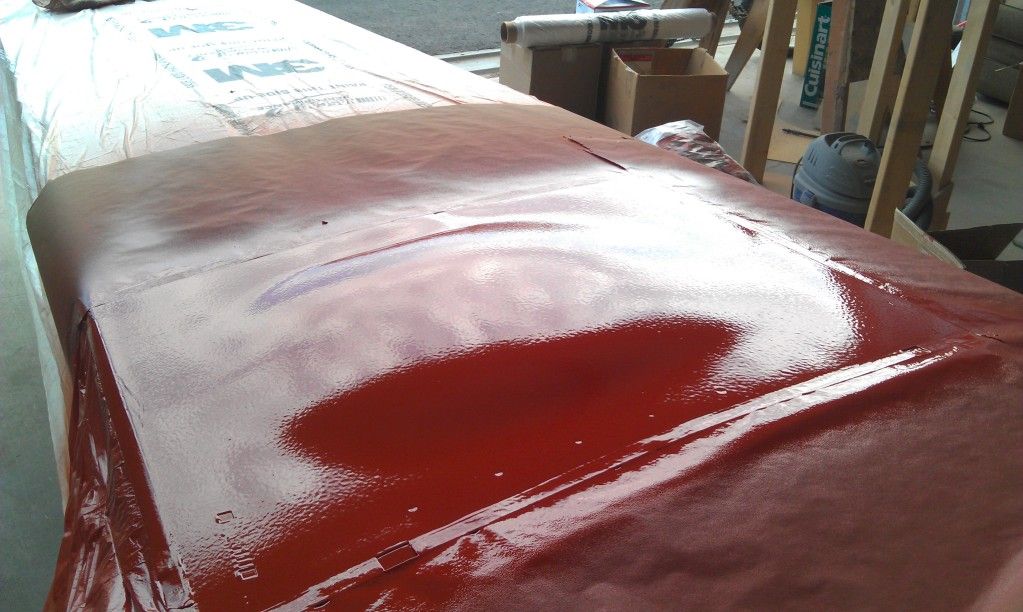
UPDATE: This morning at 5AM (early to take advantage of the coolest part of the day… 90F here in Arizona) I sprayed the new orange tooling gel coat from Fiberglass Supply on my plugs. As expected it was another learning experience. Follows are my observations/mistakes:
The viscosity of the orange tooling gelcoat is a bit thicker than the clear gelcoat ordered from the same supplier, consequently the #5 tip (with my G100 cup gun at 60psi) was a bit small. This resulted in the gelcoat going on too slow and kicking in the cup prior to applying the recommended 18 mils as per the TDS. I quickly swapped the #5 tip for a #6, catalyzed and sprayed a new batch of gelcoat.
Mistake #1: Using a tip that was too small for the thicker viscosity tooling gelcoat which resulted in my not getting the full 18 mils down before batch #1 gelled.
Mistake #2: I failed to explain the use of the wet film thickness gauge properly to my friend who was helping me… Result: The combined film thickness of batch #1 and #2 that I sprayed back to back was a bit thick 20-25+ mils. I was worried the 2nd coat was going to cause the 1st coat to alligator but it didn’t… thankfully!!
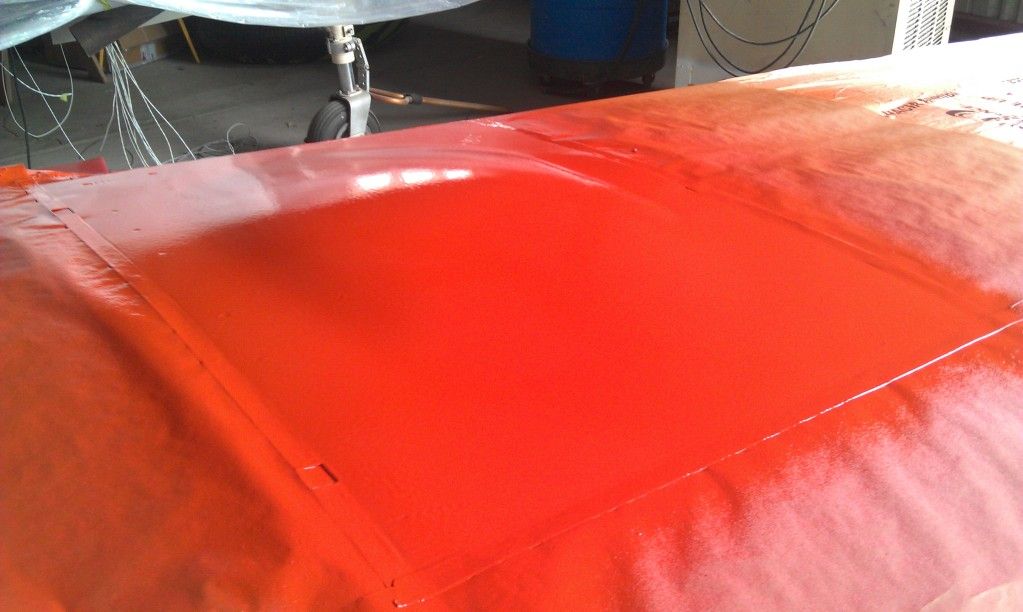
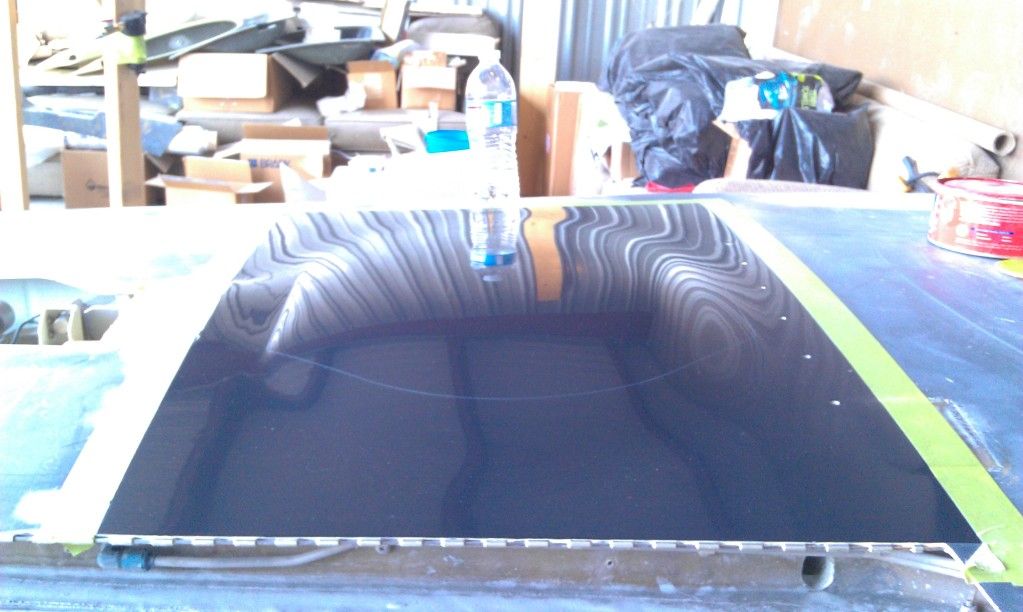
I waited 2hrs and sprayed another coat, this time adding another 14-18 mils approx. This should have resulted in a total gelcoat thickness of 34-43 mils. As you can see from the pics, the gelcoat layed down very nicely (the specs you see are the result of my cup gun spitting out semi gelled material when the first batch started to gel in the gun – I don’t think this will present a problem, any thoughts/comments to the contrary appreciated). Other than the mistakes identified above I’m fairly pleased with the results.
Pics below:
http://i1095.photobucket.com/albums/i477/jbocek/Glasair%20project/IMAG1047.jpg
http://i1095.photobucket.com/albums/i477/jbocek/Glasair%20project/IMAG1048.jpg
http://i1095.photobucket.com/albums/i477/jbocek/Glasair%20project/IMAG1045.jpg
http://i1095.photobucket.com/albums/i477/jbocek/Glasair%20project/IMAG1046.jpg
Next comes the veil with VE resin… I’m still trying to decide it would be best to apply the veil after the last coat of tooling gelcoat has cured for 4-6 hrs (it will be 110F+ mid day here in AZ by then) or wait until early AM tomorrow when its 90F (but that will mean the gelcoat will have been sitting for 18+hrs). I do have some gel time extender so I can go either way in terms of the VE resin so its more a question of how long the gelcoat sits before applying the veil AND the ambient temp when I apply the veil. Any comments/advice appreciated…
Well done! The little boogers in the gelcoat should not cause any harm.
As for time: again, datasheet, but in general you should be OK in both ways. If it happens that the gelcoatcured completely (little experience with that, as temperatures are never that hot over here) then sand it lightly. Very lightly.
However, I would prefer to go over it asap.
Thanks for the quick resposne Herman! I’m going to heed your advice and go ahead and apply the veil this afternoon with some gel time extender in the VE resin (the 2nd coat of gelcoat will have 5-6 hrs of cure time by then).
I’ll let the veil sit overnight and begin my bulk up in the AM…
Go easy on the bulk. Not too fast. (shrinkage, warping)
Thanks for the advice Herman! So far I’ve layed the first layer of veil/VE resin yesterday AM… let that sit overnight and this AM I lightly sanded, blew the dust off, wiped with acetone then layed the first two layers of 1.5oz CSM/PE tooling resin - one at a time. I let the first layer exotherm and cool back down to ambient before applying the 2nd layer (approx 1hr). My plan is to let it cure overnight, lightly sand and then apply the 3rd layer of CSM, let cure (cool to ambient) then apply layers 4&5 (one right after the other with the same batch of resin) and let cure overnight before applying layers 6,7 & 8 the next day (prob 1 layer, let exotherm, then the last 2 layers). This will give me 8 layers total (approx 1/4" thick mold)
After the final laminates have cured overnight, I will bond the wood support frame (constructed out of 1"x3" hardwood) to the mold by lapping some CSM from the mold up onto the frame sides (around the perimeter flange only).
Is this layup time too aggressive or am I good to go…?
I then plan on building a homeade oven out of some insulation board, temp controller, fan and heat element to post cure the molds before demolding. I have a call into the kit manfuacturer to find out if they post cure the wing skins or room temp cure them (the wing is constructed with Derakane VE resin - which is supposed to have a HDT of around 212F, but I dont know if that is with a post cure or with a room temp cure (I mentioned only heating to 170ish in my private mssg thinking that 170 was a safe enough margin below the 212F to not risk damage to the wing skins.
I guess you are good to go.
Desperately need help! So I came down early this morning to apply the next layers of csm (3rd & 4th layers) and the parts had pre released around 60 percent of mold #1 and 20 percent of mold #2. As near as I can tell it has lifted approximately 1/6th to 1/8 of an inch in areas and none in others. I need help desperately as I cannot afford to keep redoing this. Can anyone help me figure out what I’m doing wrong? Thought about continuing the bulk up and having a slightly deformed part but then my thought the mold will continue to deform even more as the additional layers shrink.
That is a real bummer. What you can do is use vacuum to pull the mould back to shape (I hope you have an inch or so to spare) and laminate the next layers. This possibly saves the layup.
Is the plug distorting with temperature changes?
UPDATE:
After carefully analyzing, lightly pressing & measuring the amount of pre-release I decided to scrap the molds and start over (completely frustrated at this point as each attempt is costing time and money that I don’t have). BTW: I thought of vacuum bagging the next layers (Herman) but there is no easy way to seal around the perimeter of the mold due to the outer gear door opening AND the fact that the mold runs right up to the trailing edge of the wing). See image below (the white material just beyond the left edge of the polished plug, center of the pic, is porous expanding foam /// The lower edge of the plug is the trailing edge of the wing… actually the hinge for the flap):
http://i1095.photobucket.com/albums/i477/jbocek/Glasair%20project/IMAG1030.jpg
Note the following:
[FONT=Calibri]1. [/FONT]When I sprayed the orange PE tooling gel coat, the first coat was a bit thick (25+ mils whereas I was shooting for 18 mils) as my friend was reading the mil thickness gauge incorrectly.
[FONT=Calibri]2. [/FONT]There was no noticeable pre-release before applying the veil with VE resin (the first coat of tooling gel was allowed to cure for 2hrs before applying the 2nd coat of tooling gelcoat, then the 2nd coat cured for 6hrs before applying the veil).
[FONT=Calibri]3. [/FONT]I allowed the VE/veil to cure overnight and VERY lightly sanded/cleaned with acetone before applying the first bulking layers of 1.5oz CSM. There was no noticeable pre-release prior to applying the first bulking layers with the following PE tooling resin: [COLOR=blue]http://www.shopmaninc.com/specs/spec404.html[/COLOR]
[FONT=Calibri]4. [/FONT]I allowed the first bulking layer to cure for approx 1hr before applying the 2nd layer – At this point I stopped to let cure overnight. In the am the next day (today) is when I noticed the pre-release.
[FONT=Calibri]5. [/FONT]The part literally fell off the mold when I lifted on an edge… Waxed with dolphin wax.
[FONT=Calibri]6. [/FONT]There is zero distortion of the plug (very rigid) not to mention the highest temp the curing part saw was approx 125 F.
Here some thoughts that I had… I would appreciate any corrections & advice as to what I can do to prevent this from happening again (each re-do is costing time and money).
[FONT=Calibri]1. [/FONT]Ensure the correct wet film thickness of tooling gelcoat (thinking the gelcoat being a bit on the thick side may have contributed to the problem… that said I removed a small sample of the 1st coat of gelcoat after cure and it was approx 20-25 mils… that could very well mean the wet film was 25-30 mils?
[FONT=Calibri]2. [/FONT]Look for a different PE tooling resin (Herman, you said in one of your responses “ Read the datasheet, this is not a rapid tooling system……,you do not need (or want) the exotherm, as there are no shrinkage compensating polymers in this resin, which means you need to keep things cool to keep thing straight.” What resin do you recommend I buy??? (please recommend something that I can purchase in the USA that will not shrink AND that does not require a high exotherm as I cannot use anything that will exotherms higher than approx 165-175F)
[FONT=Calibri]3. [/FONT]Wait longer to apply the 2nd layer of bulk? (I waited 1hr… perhaps I should have waited overnight… and then overnight between subsequent layers until at least 4 layers had been applied/cured)
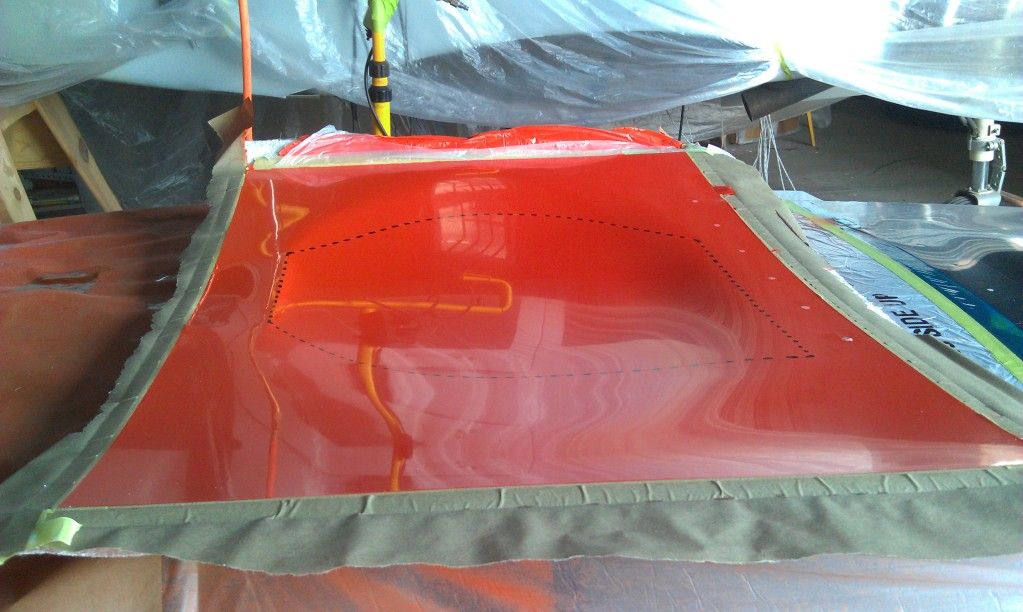
[FONT=Calibri]4. [/FONT]The plug is approx 21” x 32” and is slightly convex in shape. Am I going to run into problems with pre-release no matter what due to the size/shape of the plug?? The mold surface was beautiful, its just a shame it pre-released (notice the shape, this is pretty close to the desired shape as the mold only lifted 1/8” max in certain areas) See image below: (the shape of the actual gear door that will be constructed in the mold has been dotted around the perimeter with a black marker for clarity)
http://i1095.photobucket.com/albums/i477/jbocek/Glasair%20project/IMAG1056.jpg
Of the above, #2 seems the most logical but I need someone to recommend a good room temp cure PE tooling resin that contains shrinkage compensating polymers AND that will safely exotherm below 165-175F.
The only one I am familiar with is RM3000 from Nord Composites, I believe it is marketed in the USA by NidaCore. This resin will not shrink, but does not need to be applied in 1800 gram (6 oz) batches. (4x1.5oz)
By the way, I totally overread your 1.5oz mat. Do you have any thinner? If so, please use that. 0.75 would be ideal, but 1oz is also OK. If you need to use the 404 resin, build up very slowly. It seemingly shrinks a lot. Wait 24 hours before applying the next layer.
Mould making is a long duration job, that is why they invented the rapid tooling systems.
Since vac bagging does not appear to be an option (I dont see a way to seal the bag around the perimeter of the mold) what do you think of “gently” laying some sandbags on the laminate to weigh each layer down (after it sets up but before it finishes exotherming… possibly with some release film between the laminate and the sandbags to keep the bags from sticking)? Would this help keep the laminate in place and avoid pre-releasing?
Also, (Herman) I do have .75oz CSM as that is what I used for the veil.
Even if I apply, many more layers of .75oz or 1oz CSM to get to the required tool thickness, letting each cure 24hrs before applying the next, wont I still have a shrinkage probelm when I post cure the tool before demolding???
One other thing that I forgot to mention was how I wetted out the 1.5oz CSM (thought I’d mention in case that is part of my problem)… I layed the CSM on the plug dry and then poured the resin on and quickly spread it out with a 3" brush, painting & dabbing more as necessary to fully wet out the CSM in dry areas. Some areas where the resin was poured appeared to be fairly resin rich…